APOLLO
11 OPERATIONS HANDBOOK BLOCK II SPACECRAFT
Transposition and
Docking Diagram
CSM-LM Docked Crew
Activities Diagram
LM Separation From
CSM Diagram
LM Ascent Stage
Lunar Launch Diagram
Post Lunar Docking
Crew Transfer Diagram
LM Ascent Phase
Separation From CSM Diagram
CSM Transearth
Injection Diagram
Docking System -
Major Assemblies Diagram
Automatic Docking
Latches Diagram
Probe Assembly
Docking System Diagram
Probe Operational
Positions Diagram
Pitch Arms and
Tension Linkages
Exploded View -
Probe Assembly Diagram
Docking Probe
Attenuator Assembly Diagram
Probe
Body-Extension Latch Assembly
Extension Latch
Assembly Diagram
Probe Capture Latch
Assembly Diagram
Aft View Docking
Probe Diagram
Integrated Ratchet
Assembly Diagram
Integrated
Ratchet Assembly Operation Diagram
Probe Retraction
System Diagram
Tunnel
Lighting and Electrical System Diagram
Forward Pressure
Hatch Diagram
This section contains the information identifying the
physical characteristics of the docking system and the operations
associated with docking and separation.
The following sequence of docking illustrations and
text describes in general the functions that are performed during docking.
These activities will vary with the different docking modes.
After the spacecraft and third stage have orbited the
earth, possibly up to three revolutions, the third stage is reignited (SIV
B Ignition Diagram) to place the spacecraft on a translunar
flight.
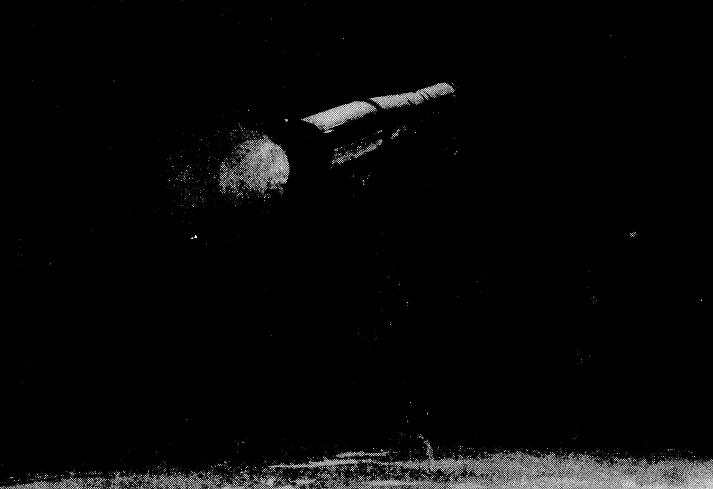
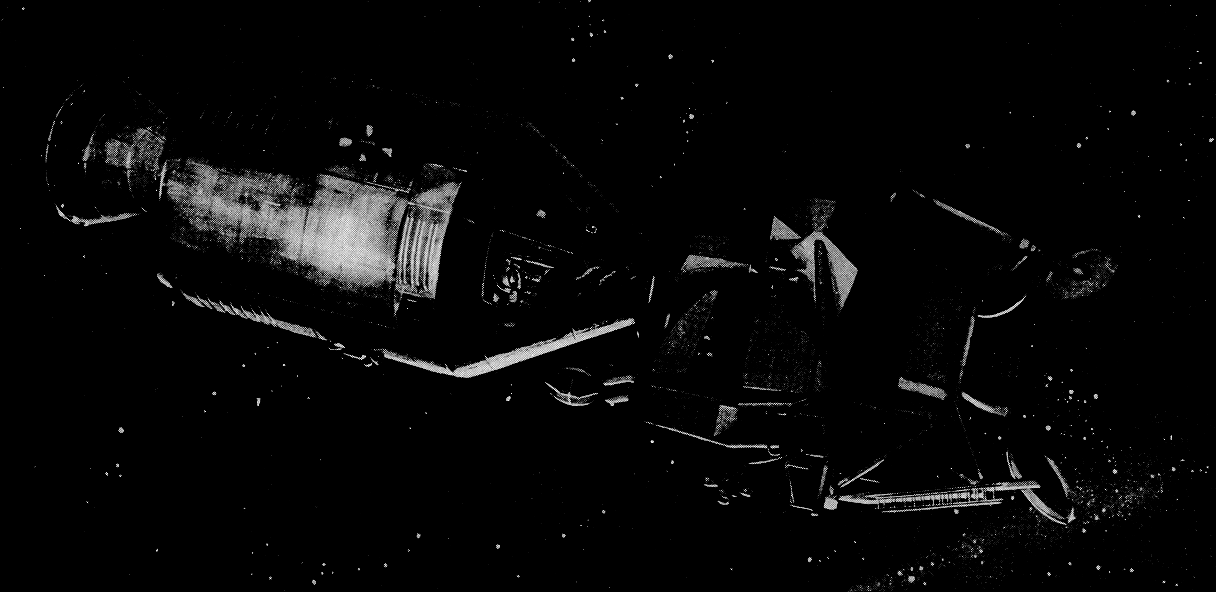
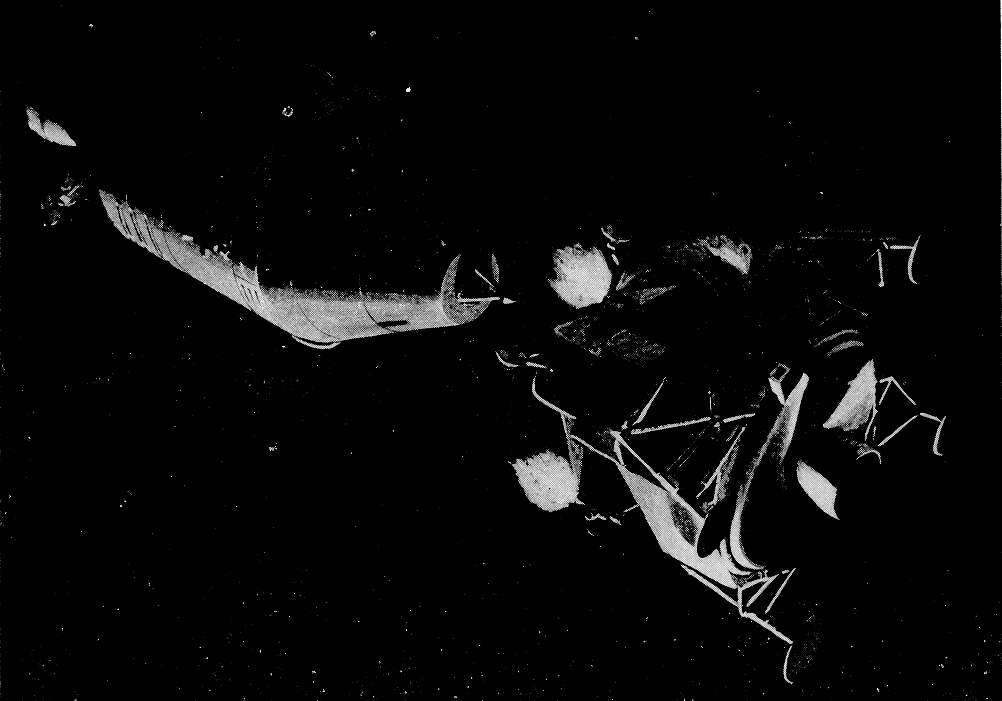
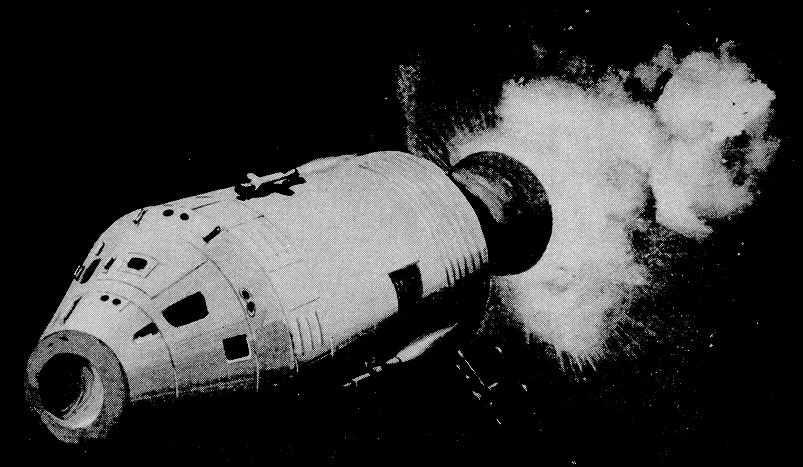
Shortly after translunar injection, the spacecraft
transposition and docking phase takes place (Transposition and Docking Diagram).
When the CSM is separated from the third stage, docking is achieved by
maneuvering the CSM close enough so that the extended probe (accomplished
during earth orbit) engages with the drogue in the LM. When the probe
engages the drogue with the use of the capture latches, the probe retract
system is activated to pull the LM and CSM together.
Transposition and
Docking Diagram
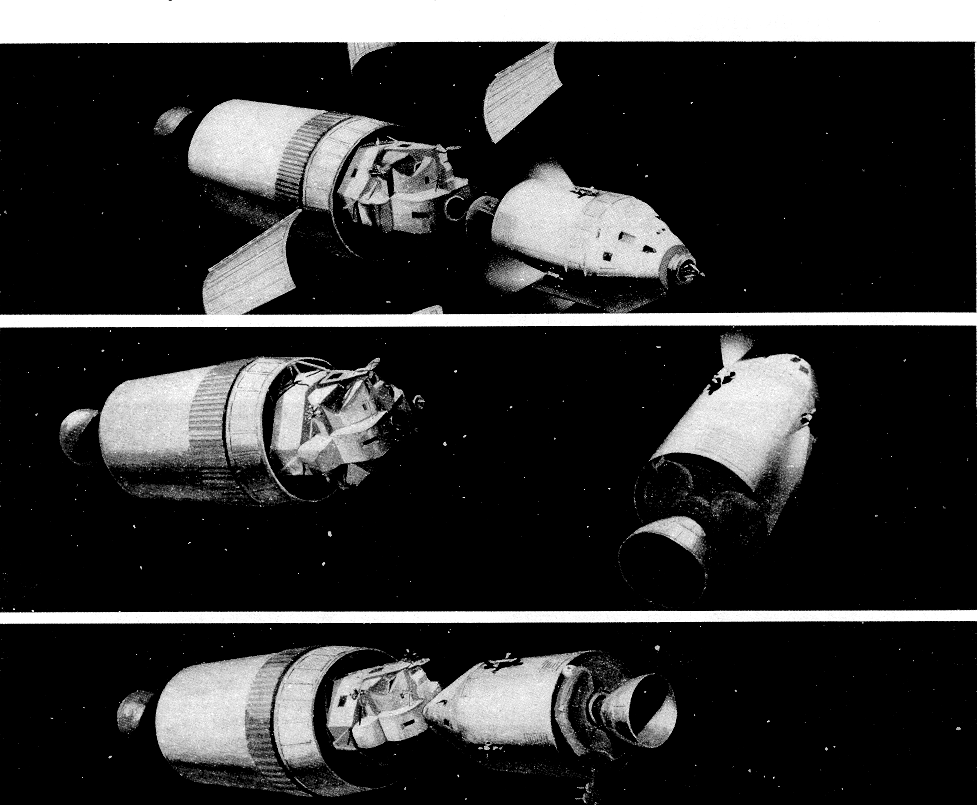
Upon retraction, the LM tunnel ring will activate the
12 automatic docking ring latches on the CM and effect a pressure seal
between the modules through the two seals in the CM docking ring face.
After the two vehicles are docked, the pressure in the tunnel is equalized
from the CM through a pressure equalization valve. The CM forward hatch is
removed and the actuation of all 12 latches is verified. Any latches not
automatically actuated will be cocked and latched manually by the crewman.
The LM to CM electrical umbilicals are retrieved from their stowage
position in the LM tunnel and connected to their respective connectors in
the CM docking ring.
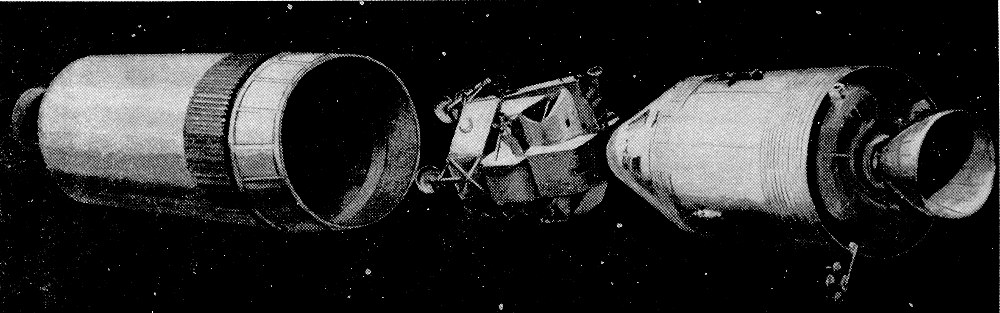
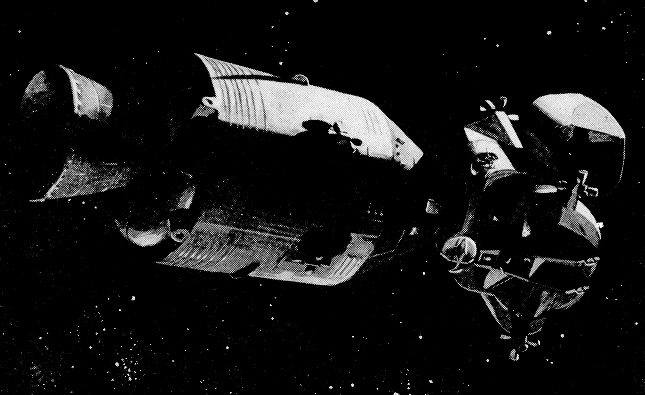
The vehicle umbilicals supply the power to release the
LM from the SLA. Once the hold-down straps are severed, four large springs
located at each attachment point push the two vehicles apart (LM Removal Diagram) and
the combined CSM/ LM continues towards the moon.
Once in lunar orbit, the tunnel is repressurized. The
probe assembly and drogue assembly are removed from the tunnel and stowed
in the CM. The pressure in the LM is equalized through the LM hatch valve.
With the pressure equalized, the LM hatch is opened and locked in the open
position to provide a passageway between the two modules. (CSM-LM Docked Crew Activities
Diagram)
CSM-LM Docked Crew
Activities Diagram
After two crewmen transfer to the LM, the CM crewman
retrieves the drogue from its stowage location in the CM, passes it
through the tunnel, and helps to install and lock it in the tunnel. The
drogue may be installed and locked by the LM crewmen, if they choose. The
probe assembly is then retrieved from its stowage location in the CM and
installed and preloaded to take all the load between the modules. This
accomplished, the LM hatch is closed by the LM crewmen. The 12 docking
latches are released and cocked by the crewman in the CM so that the
latches are ready for the next docking operation. The CM forward hatch is
reinstalled and checked to assure a tight seal. The modules are now
prepared for separation.
The probe EXTEND RELEASE/RETRACT switch in the CM
(MDC-2) is placed in the EXTEND position, energizing the probe extend
latch. The probe extends and during extension will activate a switch
energizing an internal electric motor to unlock the capture latches. After
the probe extends, the LM pulls away from the CM (LM Separation From CSM Diagram)
and descends to the lunar surface.
LM Separation From
CSM Diagram
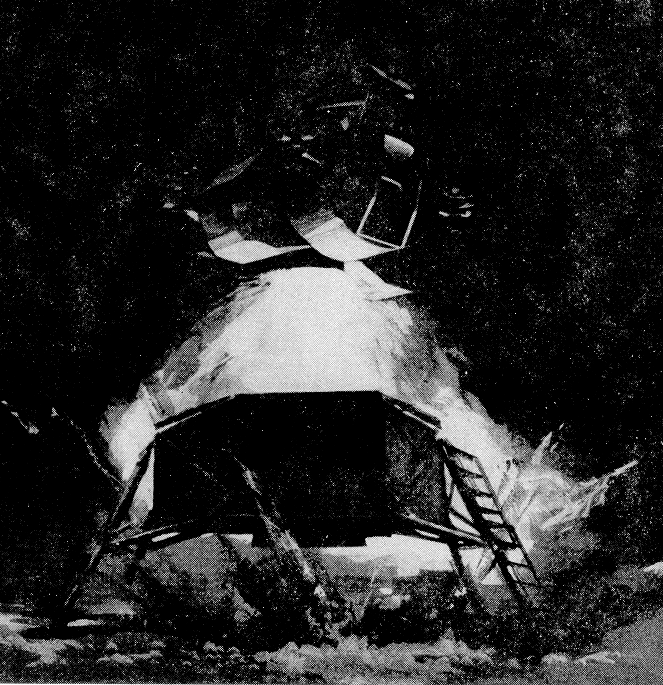
After landing, it will be several hours before the
first man steps foot on the moon. They spend the first couple of hours
checking the LM ascent stage. This completed, the cabin is depressurized
and one of the crewmen descends to the lunar surface and walks on the
moon. Following a period of crew transfer, the second crewman descends to
the surface. They have many tasks to perform, including sample
collections, photograpl1y, exploration of the lunar surface up to about
1/4 mile from the LM, and erection of a station that will continue to send
scientific data to earth after they leave.
Following completion of the lunar surface exploration
the ascent engine is fired using the depleted descent stage as a launch
platform (LM
Ascent Stage Lunar Launch Diagram).
LM Ascent Stage
Lunar Launch Diagram
After rendezvous and docking in lunar orbit, the LM
crewmen transfer back to the CM (Post Lunar Docking Crew Transfer
Diagram). After the CSM and LM pressures have equalized the LM
crew opens the LM hatch while the CM pilot removes the tunnel hatch. The
drogue and probe are removed and stowed in the LM. Lunar samples, film and
equipment to be returned to earth are transferred from the LM to the CM;
equipment in the CM that is no longer needed is put into the LM, and the
LM hatch is closed, the CM hatch is replaced, and the seal checked.
Post Lunar Docking
Crew Transfer Diagram
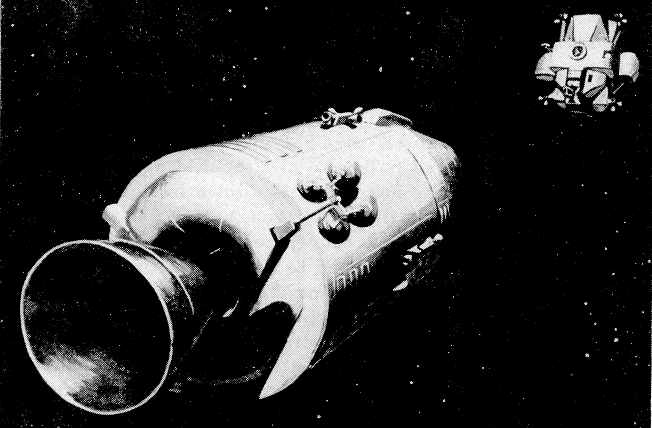
The LM is then released by firing the separation system
(detonating cord) located around the circumference of the docking ring,
thus severing the ring and separating the LM (LM Ascent Phase Separation From
CSM Diagram.) This completed, the CM SPS engine is fired
placing the spacecraft in a return trajectory toward the earth (CSM Transearth Injection Diagram).
LM Ascent Phase
Separation From CSM Diagram
CSM Transearth
Injection Diagram
The docking system is a means of connecting and
disconnecting the LM/CSM during a mission and of providing for
intravehicular transfer between the CSM and LM of the flight crew and
transferable equipment.
The crew transfer tunnel, or CSM/LM interlock area, is
a passage way between the CM forward bulkhead and the LM upper hatch. The
hatch relationship with the docking hardware is shown in the
Docking System - Major
Assemblies Diagram. (The figure does not show the installed
positions.) For descriptive purposes that portion of the interlock area
above the CM forward bulkhead to the docking interface surface is referred
to as the CM tunnel. The CM tunnel incorporates the CM forward hatch,
probe assembly, docking ring and seals, and the docking automatic latches.
That portion of the interlock outboard of the LM upper hatch extending to
the docking interface surface is referred to as the LM tunnel and contains
a hinged pressure hatch, drogue support fittings, drogue assembly, drogue
locking mechanism, and LM/ CM electrical umbilicals.
Docking System -
Major Assemblies Diagram
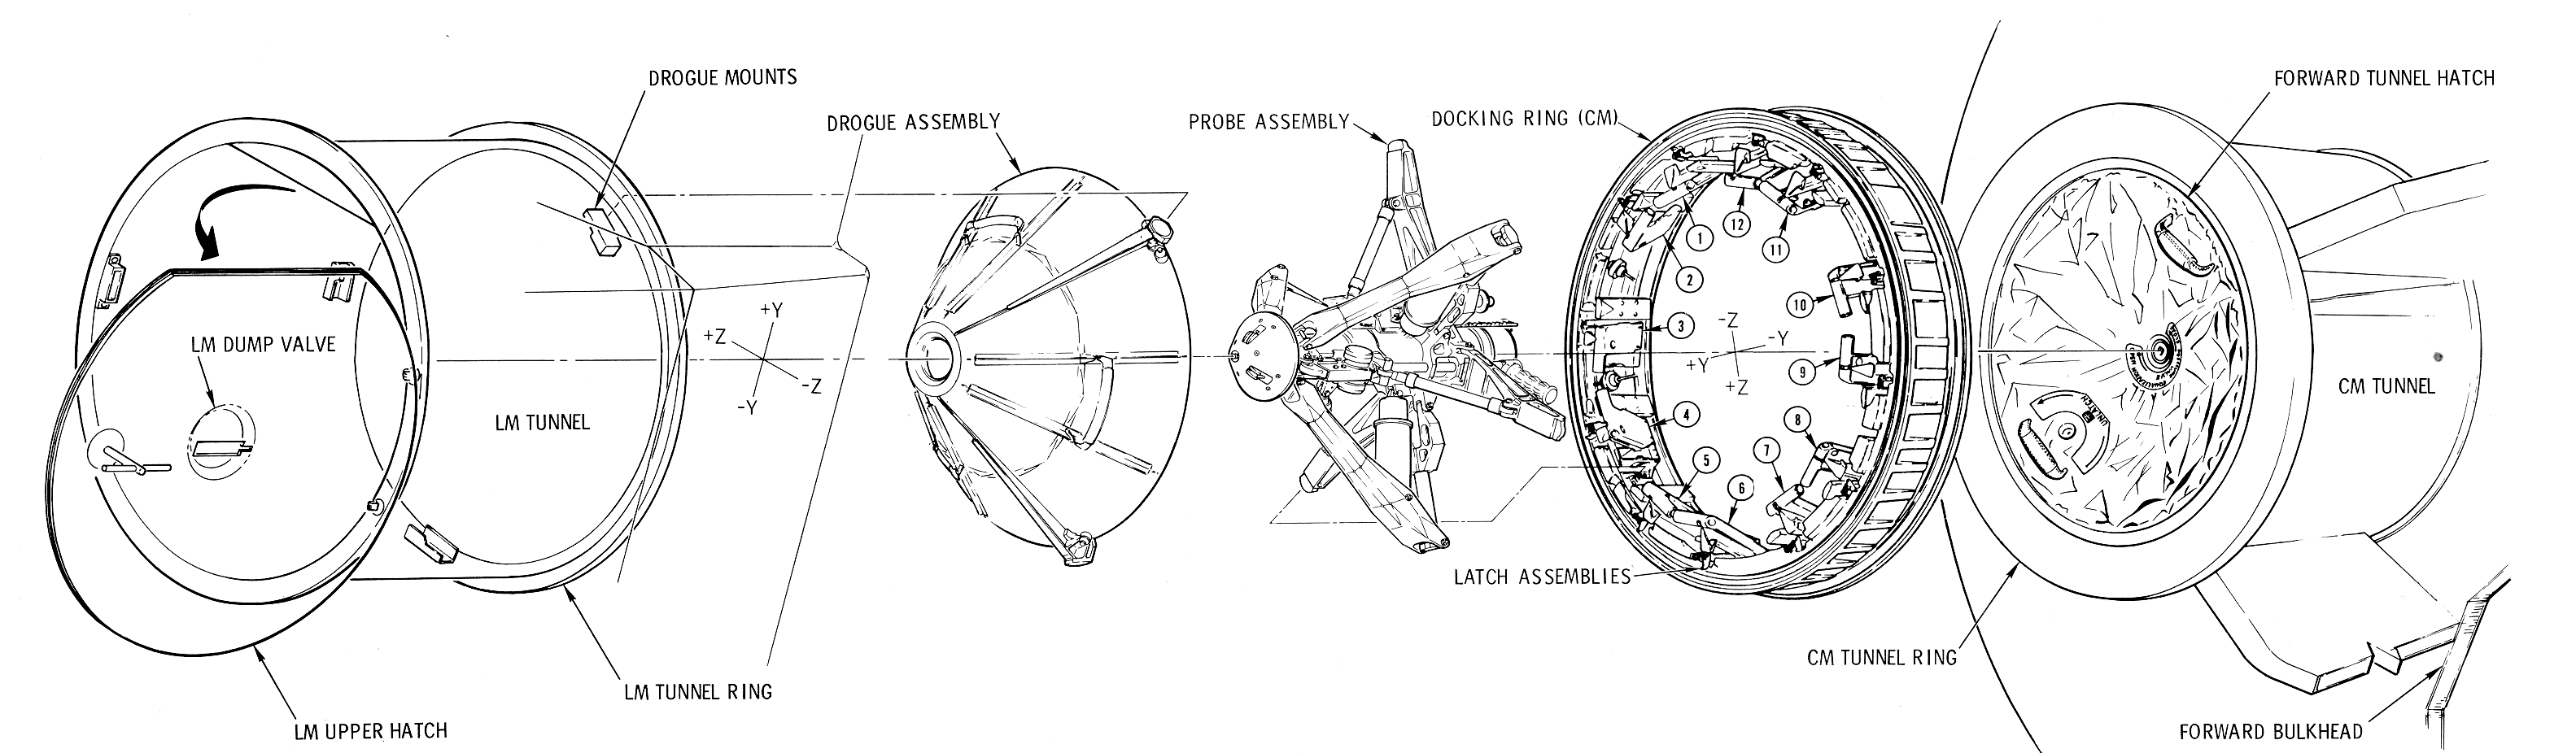
The docking ring is mounted and bolted to the forward
ring of the CM tunnel. The docking ring is capable of withstanding all
interface loads and maintains the docked alignment of the modules.
The docking ring also serves as a support for the
probe, the 12 automatic docking latches (Automatic Docking Latches Diagram),
a pyrotechnic charge, passageway for the electrical harness, and the two
interface seals. A continuous w i.re passageway and attachment covers are
provided in the docking ring. The passageway is covered by a protective
cover with an opening to allow the individual harnesses to enter or exit
the passageway. The two concentric interface seals will enable
pressurization of the crew tunnel and vented spacesuit operation within
the tunnel. The docking seals are round and hollow; the inner seal is
vented to the crew compartment pressure, and the outer seal is vented to
ambient pressure. The seals are of sufficient size to allow for maximum
warpage/waviness gap between the flanges. To remove the docking ring and
attached hardware during CSM/ LM final separation, or should an abort be
initiated, a detonating fuse (MDF) is fired to sever the docking ring.
During an abort, the severed ring and attached parts will be pulled away
from the CM by the launch escape system (LES). The charge is initiated by
a switch on the main display console (MDC) within the CM.
Automatic Docking
Latches Diagram
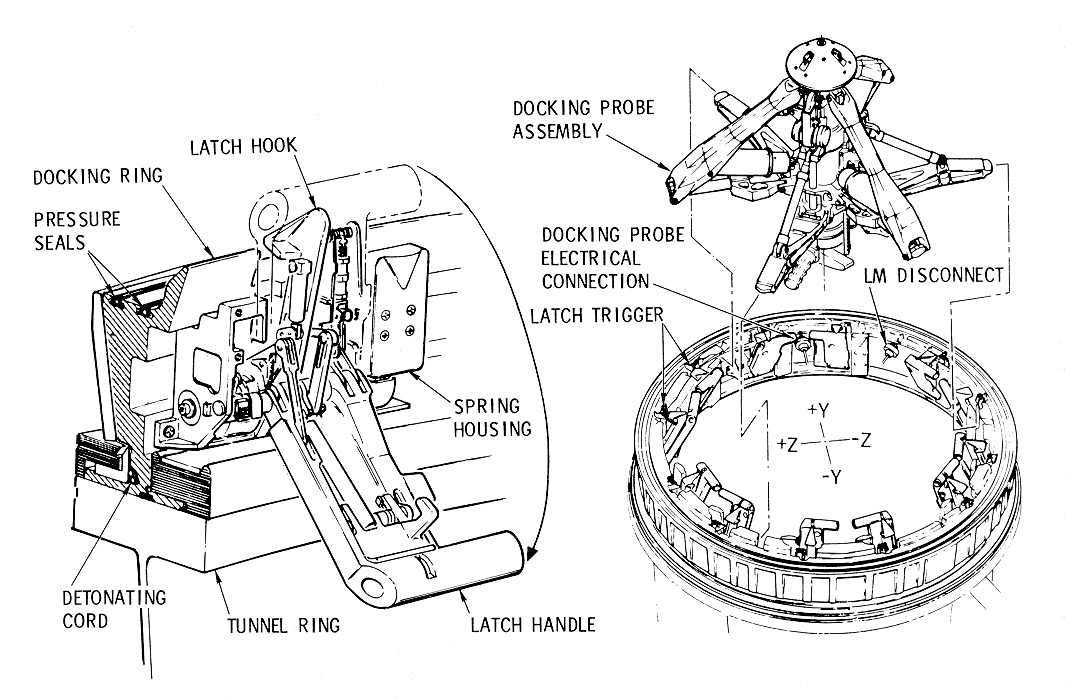
Twelve automatic locking latches are equally spaced
about the inner periphery of the docking ring. When latched, they provide
a means of effecting structural continuity and pressurization capability
between the CSM and LM in the docked configuration. The docking latches
will automatically self-seek and engage the LM docking flange back surface
upon activation of the latch trigger mechanism when making contact with
the LM docking flange. Should a latch be inadvertently triggered, the
latch components will not prevent a successful LM and CM docking and
sealing operations. A red button will protrude out of the handle
indicating an unlocked condition. Any three latches located approximately
120 ° apart engaged and latched will hold the CSM and LM together with the
tunnel pressurized. The individually triggered latch may later be rearmed
and released manually by the crewman for CM to LM engagement. The latch
mechanism will exert a preload or hook pulling force of 2700 pounds
minimum. This preload force will retract the hook, seat the hook on the
back of the LM docking flange, accommodate for flange warpage/waviness,
and compress the docking seals. Release of the latch will be accomplished
by the crewman pulling the individual latch handle for a double throw. The
release of the latch will also cock the latch for the next docking
engagement. Fairings are installed in the area between the latches
providing a smooth inner mold line.
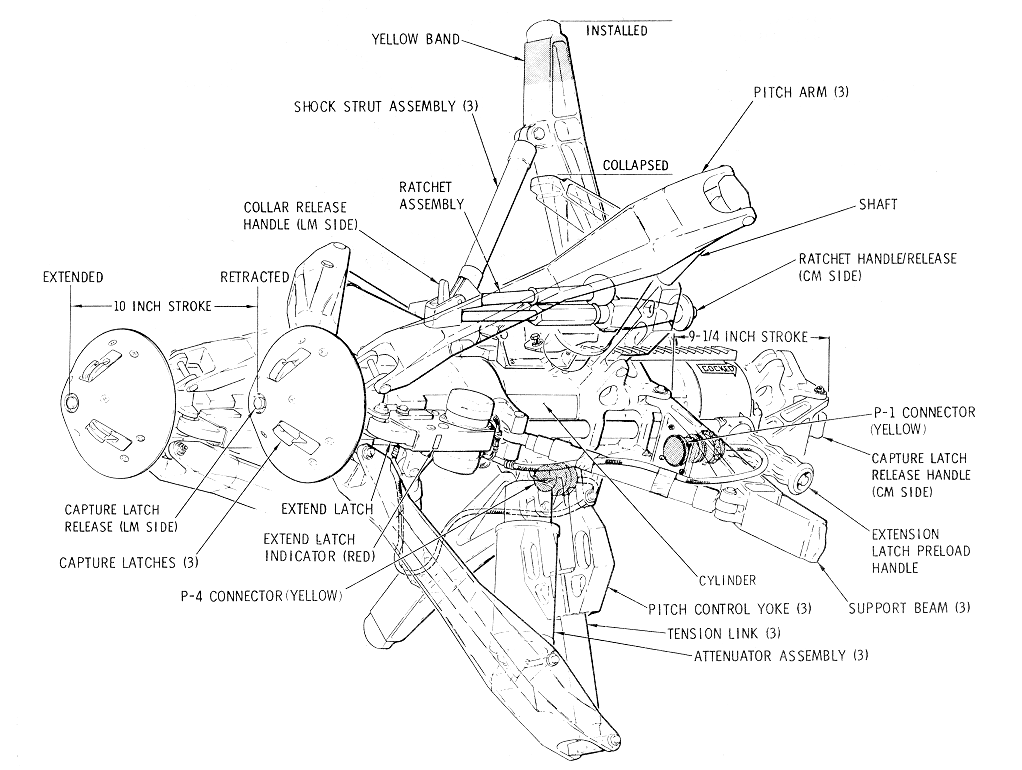
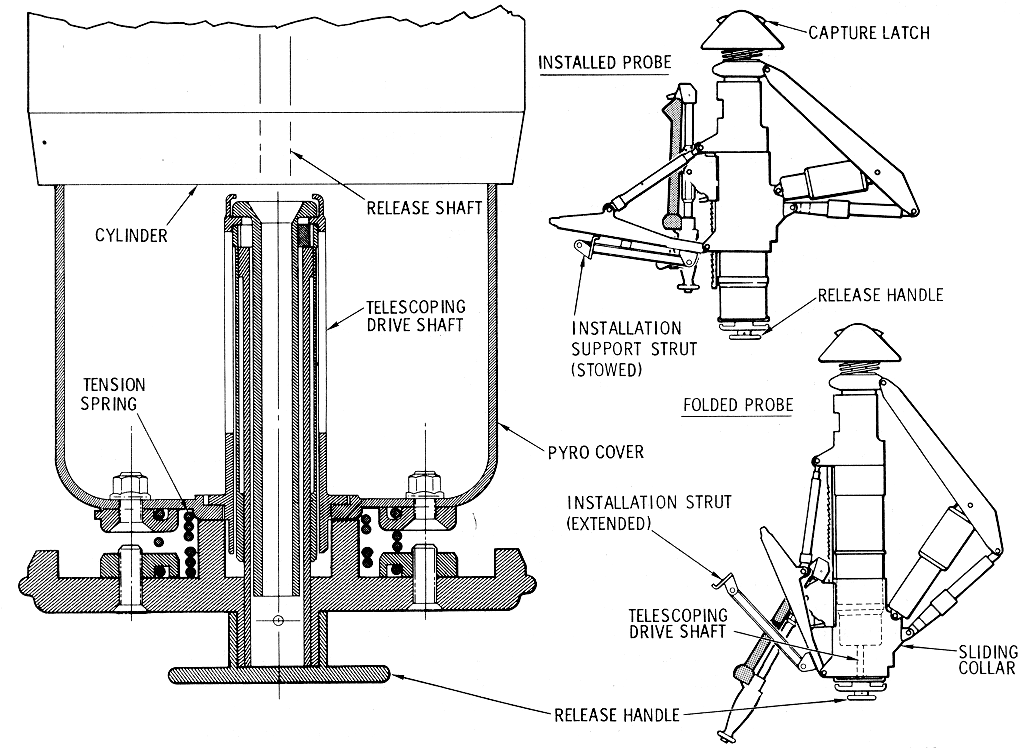
The primary function of the docking probe assembly is
to provide initial vehicle CSM/ LM coupling and attenuate impact energy
imposed by vehicle contact. The docking probe assembly (Probe Assembly Docking System
Diagram) consists of a central body, probe head and capture
latches, pitch arms and tension linkages, s hock attenuators, ratchet
assembly, support structure, extension latch and preload torque shaft,
probe retraction system, probe electrical umbilicals, and the electrical
circuitry necessary to accomplish the functions described herein. The
docking probe may be folded for removal and stowage and is capable of
being removed from either end of the crew transfer tunnel.
Probe Assembly
Docking System Diagram
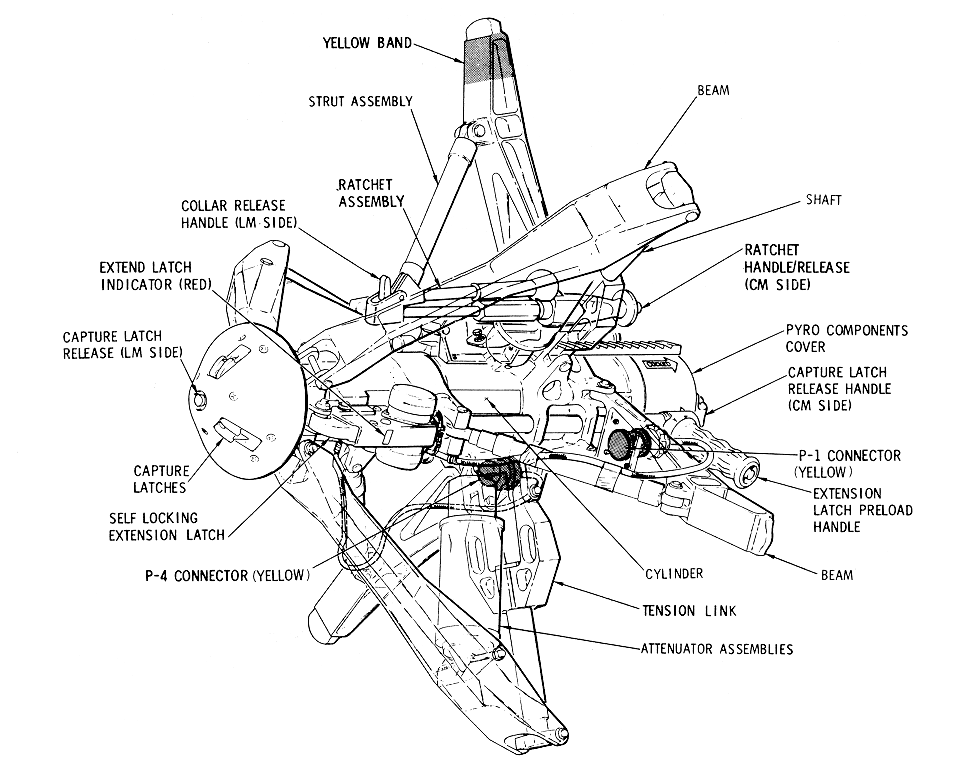
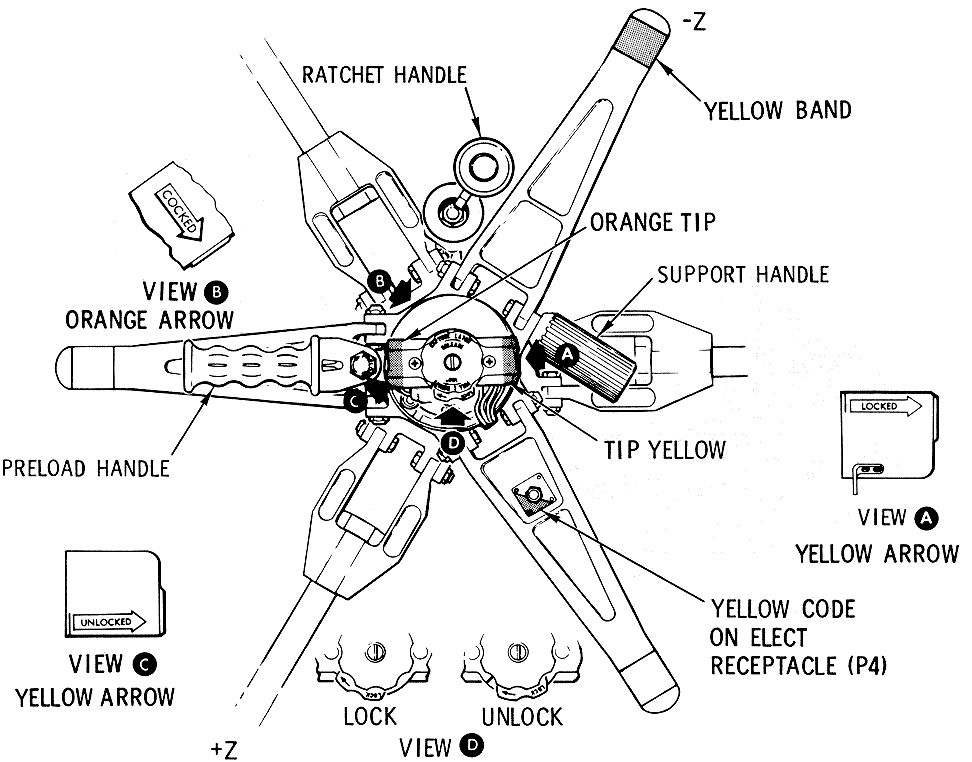
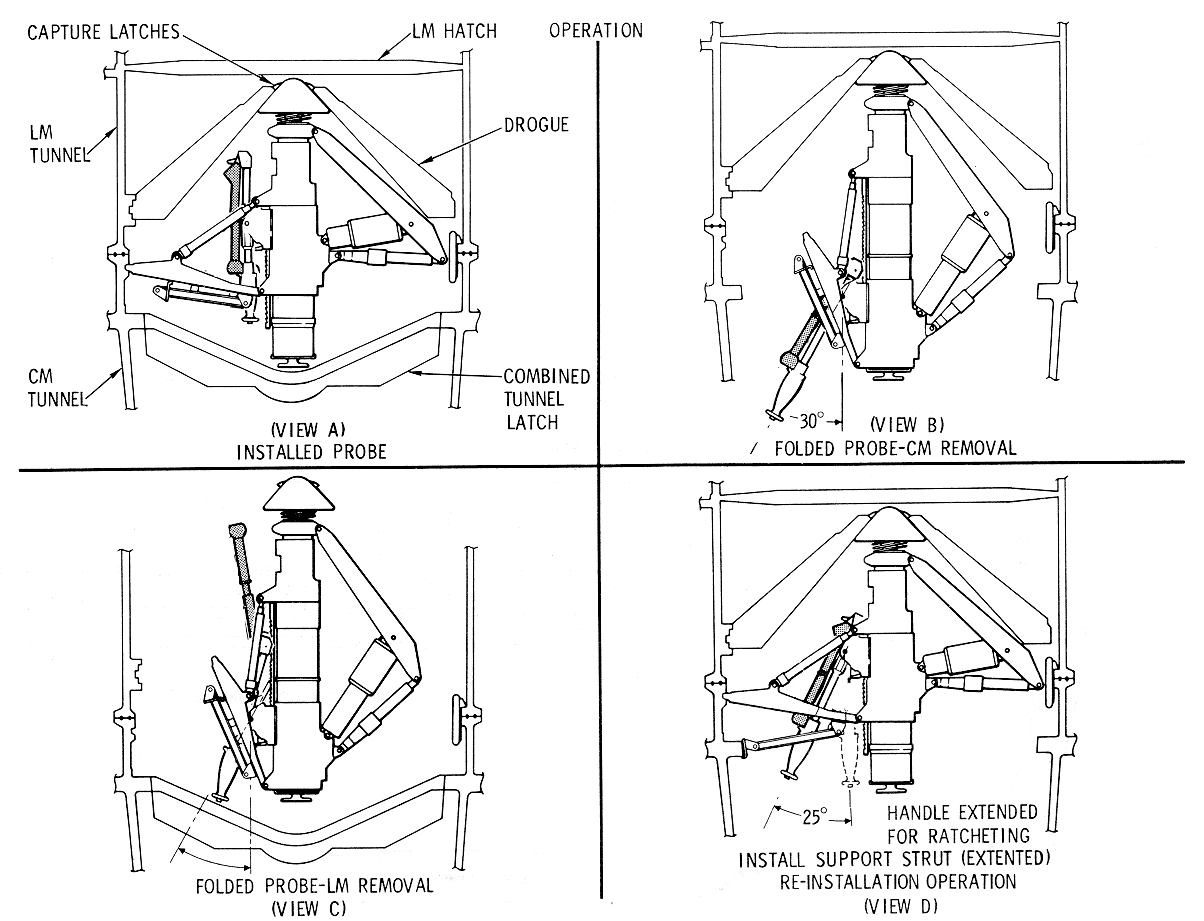
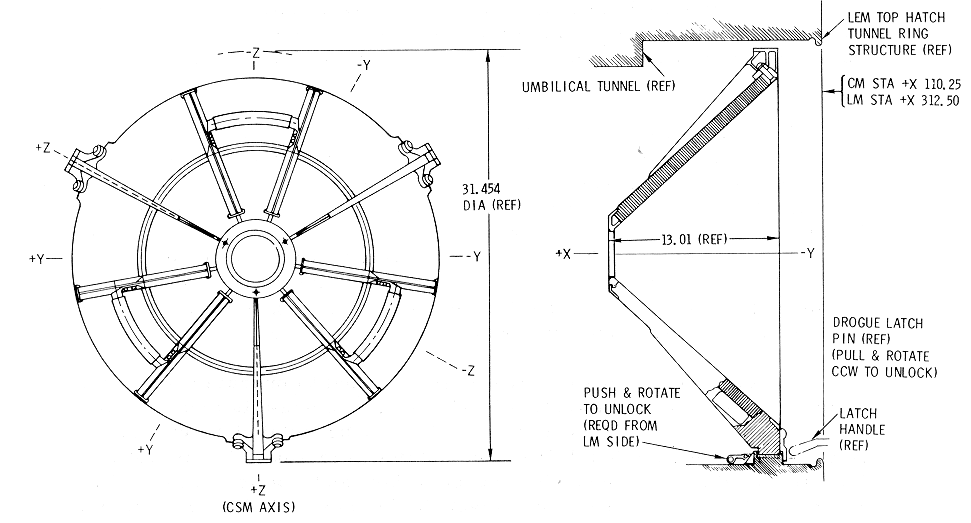
The probe is tripod.-mounted to the docking ring by a
support structure attached to the outer collar of the probe. The supports
are designed to collapse (fold) to allow removal of the probe from either
module. (Probe
Operational Positions Diagram.) Collapse of the probe consists
of reducing the diameter of the three mount legs to approximately 24-3/4
inches in diameter making the probe small enough for passage. This is
accomplished by unlatching the collar with the ratchet handle and allowing
the collar to slide aft approximately 9-1/4 inches on the probe cylinder.
Connected between each support leg and the probe cylinder is a semi-rigid
shock strut assembly (see Probe Operational Positions
Diagram). The strut assemblies contain Bellville washers which
help in attenuating the high lateral loads. The washers are concave in
shape and are arranged to provide a rigid strut in tension and a high r
ate of spring action in compression. One of the support legs is marked
yellow to correspond with a matching color on the docking ring socket
fairing. The probe installation support strut is stowed on the yellow
support beam, whereas the other two support leg s contain stowage
receptacles for the probe umbilicals.
Probe Operational
Positions Diagram
Pitch Arms and Tension Linkages
The pitch arms will make contact with the drogue
surface during the probe retraction cycle if the CM and LM tend to
jackknife. The tension links transmit the p itch arm loads and torque
loads to the probe outer cylinder during an axial displacement. Together
the pitch arms and tension linkage induce the required kinematics causing
compression of the shock attenuators, attenuating the loads necessary to
meet the docking requirements (Exploded View - Probe Assembly
Diagram).
Exploded View -
Probe Assembly Diagram
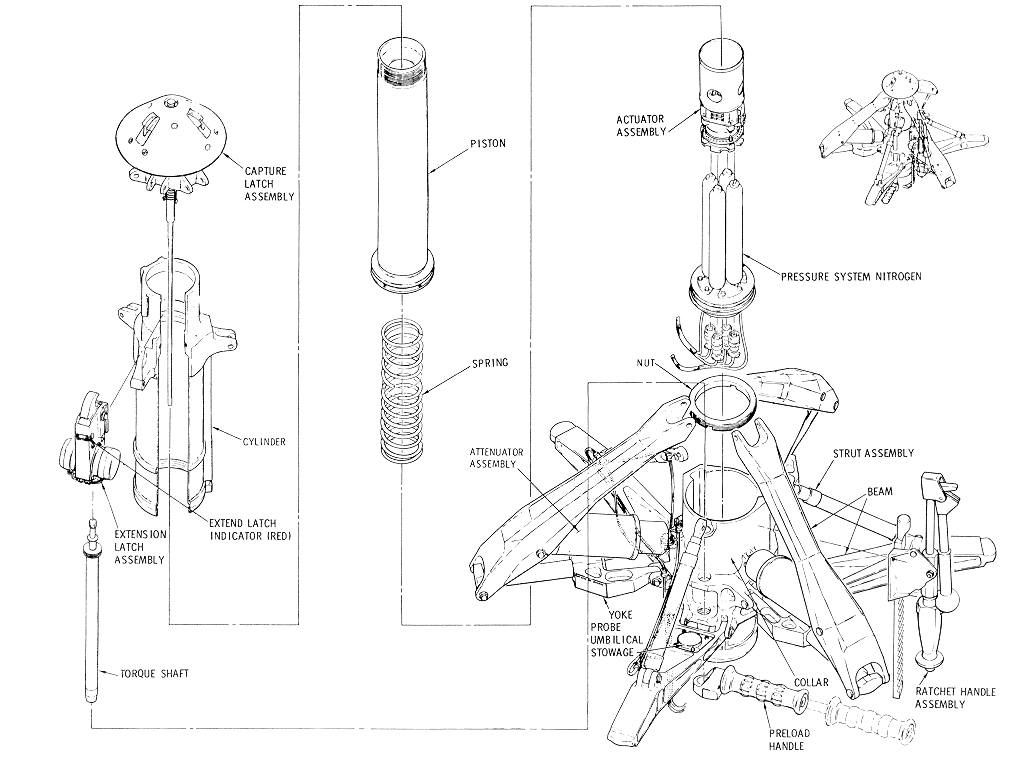
The shock attenuators are piston, variable-orifice,
fluid-displacement type units (Docking Probe Attenuator Assembly
Diagram). The attenuators are attached to the probe assembly
so that all axial loads or side loads will be attenuated to or below the
required level for the docking mechanism. The attenuator cylinders are
filled with an Orinite 70 fluid at a temperature of 70±3 °F.
Docking Probe
Attenuator Assembly Diagram
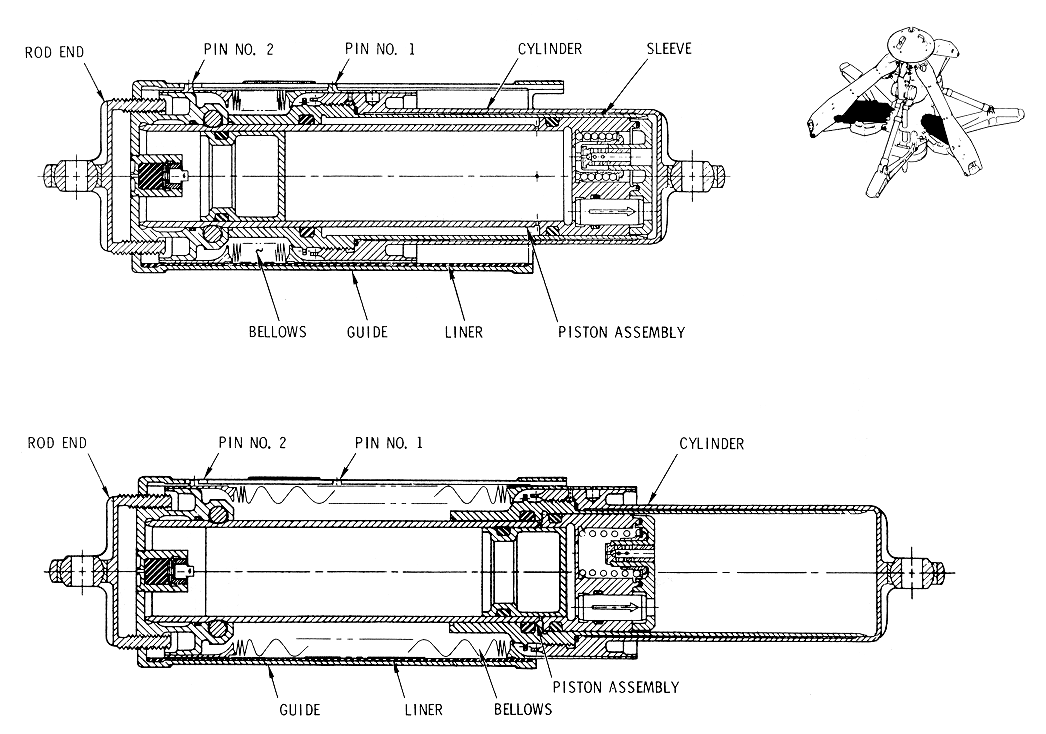
With the piston assembly extended a mixture of argon
and helium gas is inserted through a plug located under the rod end. The
gas is injected with the aid of a hyperdermic needle to a pressure of 30±3
psig at 70±5 °F. The purpose for pressurizing with gas is to provide an
air spring and pressure for attenuator extension. This stored energy
within the attenuators will cause the collar assembly to move aft when
released, pulling the support structure from its mount.
Probe Body-Extension Latch Assembly
The probe body consists of an inner and outer cylinder,
sized to allow a 10-inch maximum travel of the inner cylinder (Probe Assembly Docking System
Diagram). Attached to the probe body is an extension latch
which will engage and retain the probe in the fully retracted position (Extension
Latch Assembly Diagram). The large coil spring located within
the inner cylinder will extend the probe upon release of the extension
latch.
Extension Latch
Assembly Diagram
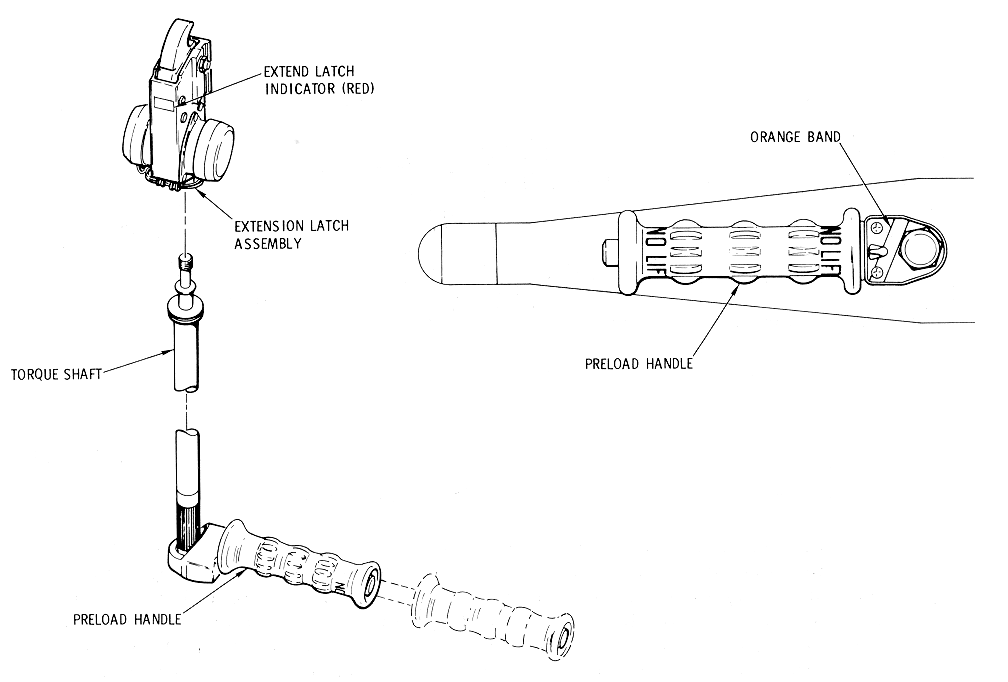
Prior to separation in lunar orbit the probe is
pre-loaded with the extend latch assembly to maintain tunnel
pressurization while the 12 docking latches are released and cocked. To
preload the probe the ratchet selector is positioned on the preload handle
so that the ratchet will rotate clockwise. The handle is ratcheted until
the load limiter releases.
The probe head is self- centering and is gimbal-mounted
to the piston of the probe assembly (Probe Capture Latch Assembly
Diagram). It houses the capture latches and is designed so
that the probe head will deflect toward the drogue socket through all
contact attitudes within the design parameters. The capture latches will
automatically engage the drogue socket when the probe head centers and
bottoms in the drogue. The capture latches are capable of remote and
manual release from the CM side, and manual release from the LM side.
Release of the capture latches will permit withdrawal or insertion of the
probe head assembly.
Probe Capture
Latch Assembly Diagram

Electrical release is accomplished by switching power
through probe umbilicals to motors within the probe body (Exploded View - Probe Assembly
Diagram) causing the torque shaft to rotate and allow release
of the latches. Manual release of the capture latches from the CM side is
accomplished by a built-in release knob and handle on the CM side of the
probe. (See Aft
View Docking Probe Diagram.) In unlocking the capture latches,
the capture latch release knob and handle is pulled aft 1/2 inch and
rotated 180 degrees CW. This can be accomplished only with the probe
piston in the retract position.
Aft View Docking
Probe Diagram
When the probe is being collapsed, the probe collar
contacts the release handle, which in turn will telescope and remain
operable with the probe installed or folded. (Capture Latch Release Diagram.)
The capture latch release handle must be rotated fully CCW to an
indicating arrow to make the capture latches "cocked," This means the
capture latches will capture when all three latches have penetrated the
drogue ring simultaneously. Release of the capture latches from the CM
side is accomplished by depressing the capture latch release plunger
approximately 5/16-inch below, flush with the probe head by using tool B
of the CM-LM tool set.
If the retracted position is selected on the RETRACT
EXTD/REL switch located on MDC-2, capture latch engagement will close a
switch within the probe, initiating operations of the retraction
mechanism.
The integrated ratchet assembly provides a handhold for
handling the probe, assists in installing and removing the probe assembly,
and performs the ratcheting operation that slides the collar forward or
aft, extending or collapsing the probe pitch and support arms (Integrated Ratchet Assembly
Diagram). The ratchet assembly will lock/unlock the sliding
collar by pivoting the handle away from the probe centerline either from
the CM or LM side. The jack handle is stowed and locked by a lug which
engages the handle on the CM side. A release button is provided on the CM
handle and a trigger release on the LM handle to unlock the ratchet
assembly.
Integrated Ratchet
Assembly Diagram
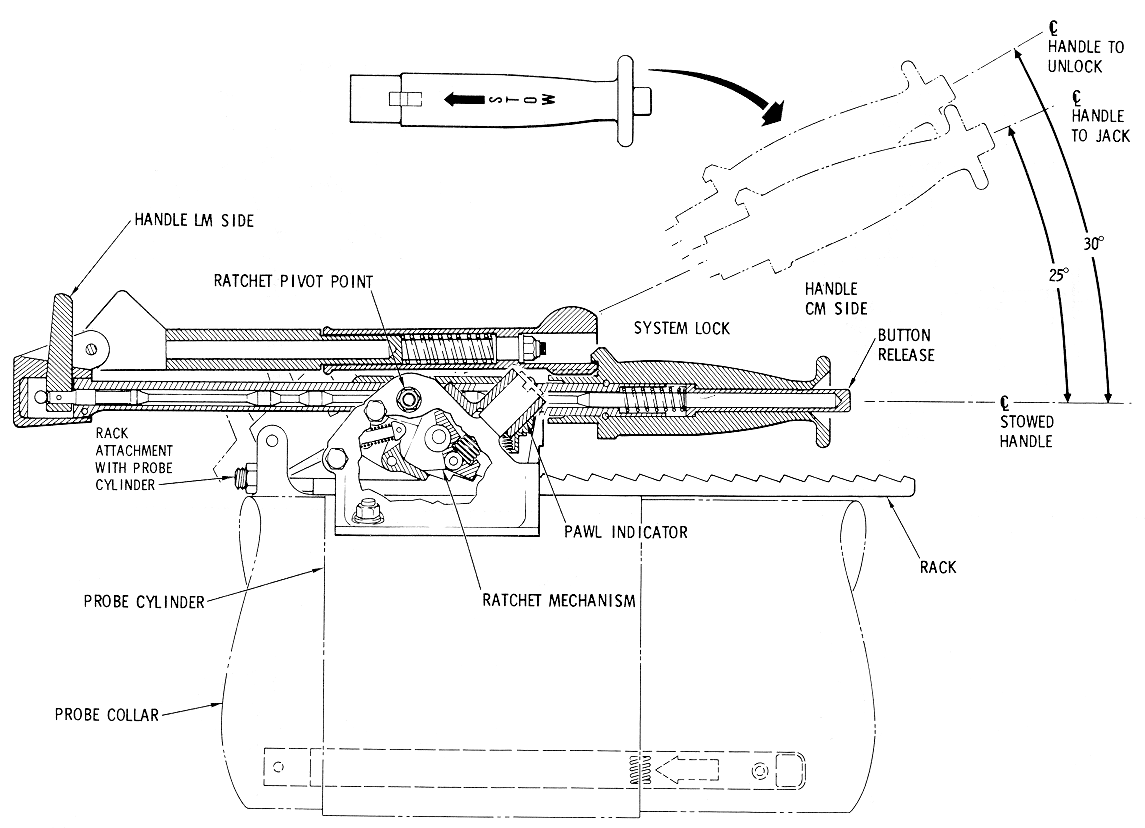
The
Integrated Ratchet Assembly
Operation Diagram shows the various ratchet handle positions
for probe removal and installation. View A shows the jack handle and
ratchet assembly in the locked and stowed position. View B shows the
30-degree stroke required to unlock the sliding collar from the CM side.
To unlock the sliding collar from the CM side, grasp the jack handle at
the CM end, depress the slide release button, and pull the handle all the
way aft. Secondly, push the handle forward to the first detent and swing
the handle out 30 degrees from the probe centerline. In the last 5 degrees
of pivoting, the pawls are lifted from the rack, the collar will slide
aft, and the probe will collapse because of the spring and attenuators
stored energy. View C shows the unlocking operation from the LM side.
First, depress the release button on the LM side of the jack handle and
push aft to the first detent. Second, unstow the foldable lever by pulling
on the handle knob and rotate the lever upward against the stop. Third,
rotate the handle asse1nbly inboard until the collar is released. Again
hold the knob until the probe folds. View D shows the 25-degree stroke
used when installing the probe. After the probe is locked in the drogue,
unstow the support strut located on the support beam, and position against
the ledge on the tunnel hatch seal ring. Pull the jack handle to its
extreme aft position. Grasp the support handle with the left hand and with
the right hand jack the probe collar forward extending the support legs
into the three support sockets in the CM clocking ring. While pulling the
handle, maintain a thrust load on the tunnel ring through the support
strut. The maximum push force on the handle should not exceed 60 pounds
for the working stroke of 25 degrees. Installation is complete when the
collar uncovers a cross-hatched area on the probe conduit. To ensure the
operator that the pawls are seated in the rack, a pawl indicator is
located on the ratchet mechanism. (See
Integrated Ratchet Assembly
Diagram.) Operation is complete when the indicating button is
flush with the housing . With the probe installed, stow the handle by
holding it parallel with the centerline of the probe and by depressing the
button release while thrusting the handle toward the probe head. The
socket of the handle will lock on a lug and prevent further handle
movement.
Integrated
Ratchet Assembly Operation Diagram
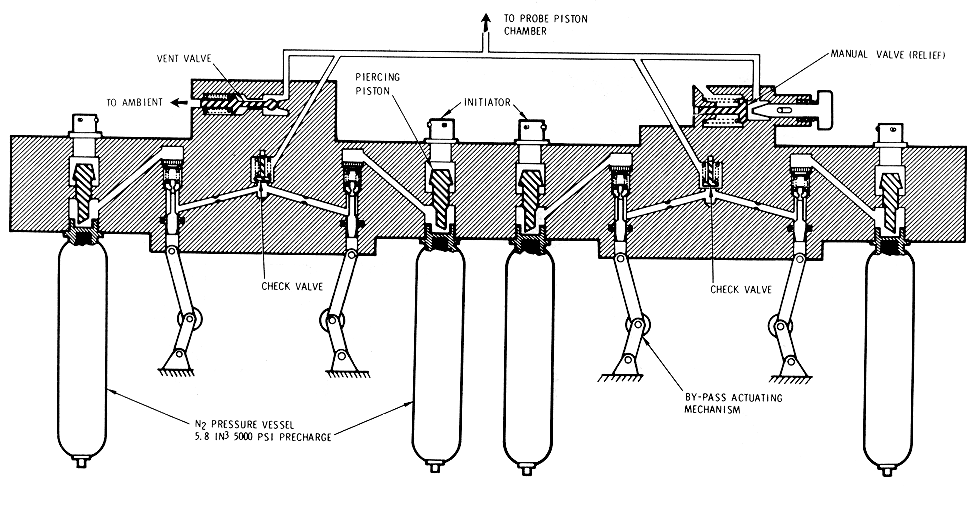
The retraction system consists of a cold gas system
pressurized from four hermetically sealed nitrogen bottles located inside
the probe body (Probe
Retraction System Diagram). Gas pressure is released when
pyrotechnic ignition is initiated manually by a crewman within the CM or
automatically by capture latch action. Releasing the nitrogen gas causes
the inner piston to retract. The retraction force is sufficient to draw
the modules together, compress the interface seals, and allow engagement
of the automatic locking latches.
The residual gas will be bled off by the astronaut
allowing the probe to extend when the extend-latch is energized. Pressure
release is accomplished by a manual relief valve located as part of the
gas manifold. This valve is opened by depressing a red thumb button on the
aft end of the probe. The button and pyro components are protected from
handling damage by a protective cover.
Probe Retraction
System Diagram
Two microdot connectors and harness assemblies are
provided for probe instrumentation and probe logic power, The connectors
are installed normal to the docking ring so they are visible and can be
demated and mated from either the CM side or the LM side of the combined
vehicles (Tunnel
Lighting and Electrical System Diagram). The connectors
utilize a notched handle that will provide a positive grip for twist and
pull action. Part of the connector and the probe harness may protrude into
the tunnel when the probe is installed, but when the probe is removed the
fixed portion of the connector will be covered by a hinged protective
cover. This provides a smooth surface for crewman passage through the
tunnel. When disconnecting or reconnecting the probe electrical connectors
from the CM side, the EXT/REL-OFF-RETRACT switch should be in the OFF
position, and CB2 on panel 276 open, to assure that no instrumentation
power exists.
Tunnel
Lighting and Electrical System Diagram
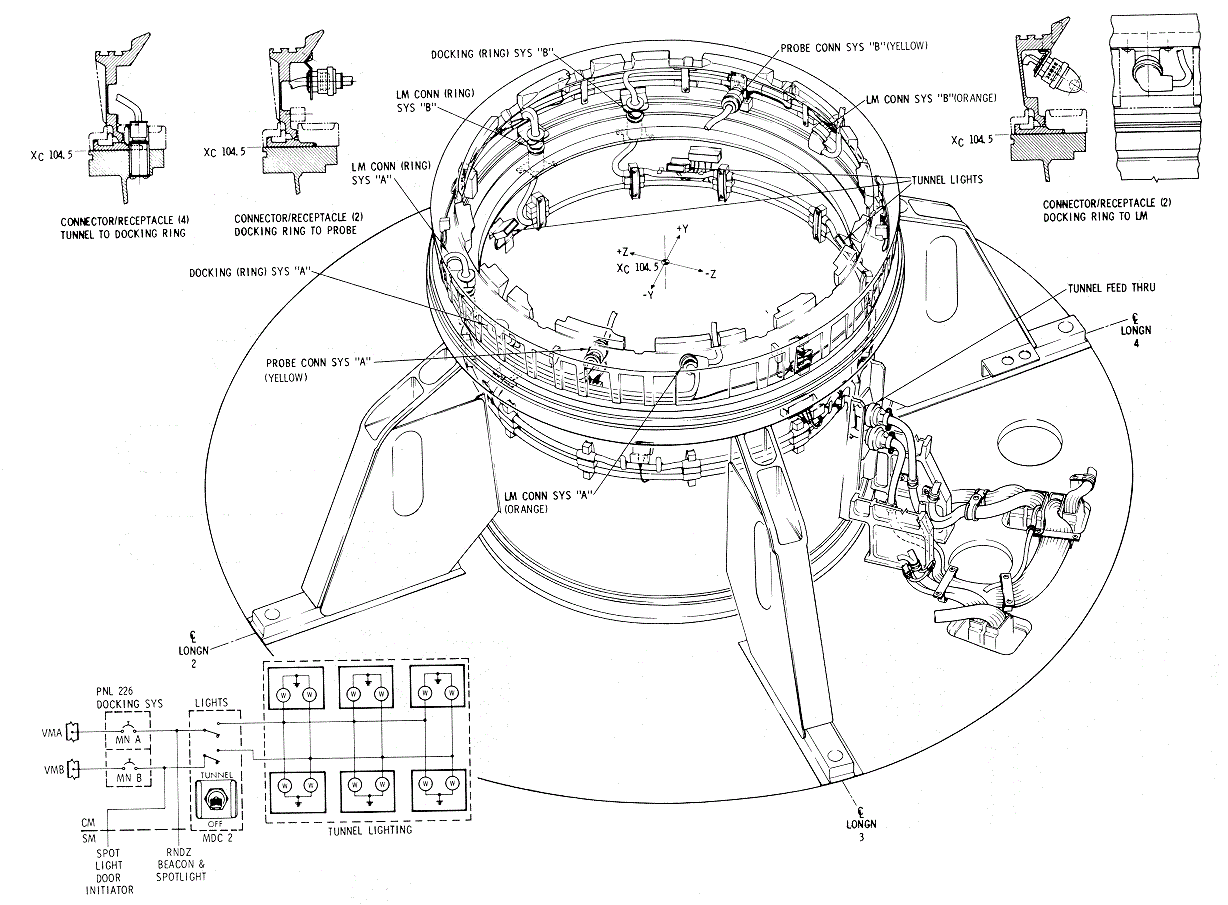
The drogue assembly consists of an inter11al conical
surface facing the CM, a support structure and mounting provisions that
interface with three mounts in the LM tunnel. One of the tunnel mounts
contains a locking mechanism to secure the drogue and prevent it from
turning during the docking maneuvers. Unlocking and removing the drogue
may be accomplished from either end of the crew transfer tunnel. To aid in
the removal and installation, three handles are provided on the LM side (Drogue
Assembly Diagram).
Two electrical umbilicals are installed in the LM
tunnel at launch. One end is attached to the LM connectors, the other end
routed and attached to stowage connectors on the LM tunnel wall. These
stowage connectors are physically clear of the drogue supports and probe
supports and pitch arms. The connectors are accessible from the C}.1
tunnel between the drogue periphery and the LM tunnel wall. In this manner
CM connections can be accomplished after transposition and docking,
without requiring probe or drogue removal. (See
Tunnel Lighting and Electrical
System Diagram.)
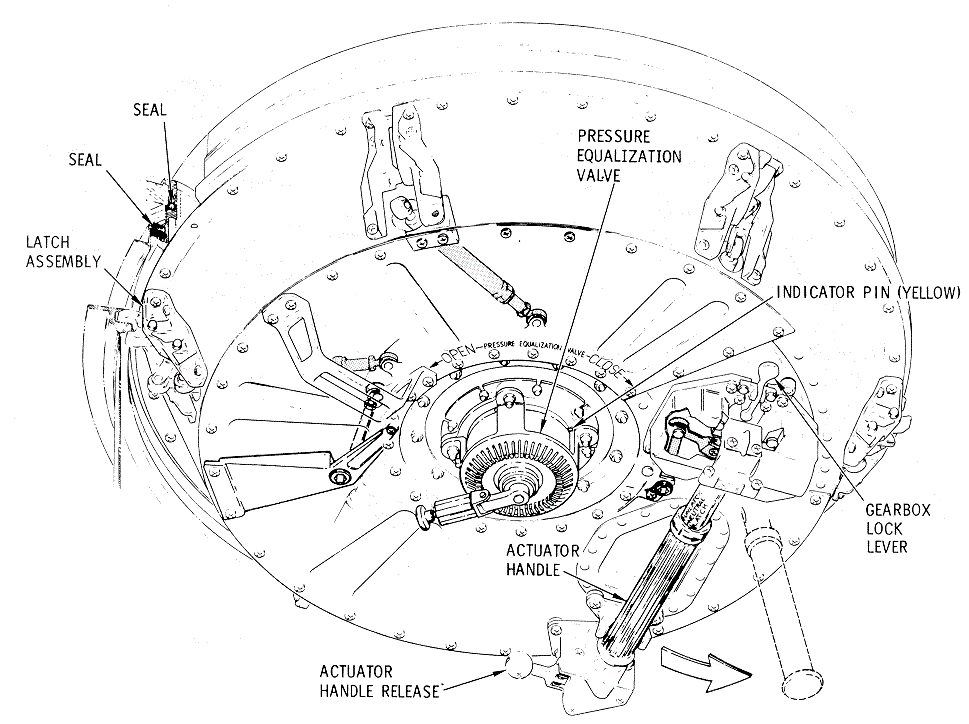
The forward hatch in the CM tunnel enables crew access
to the LM-CM interface and may be used for emergency egress after
postlanding. (See
Forward Pressure Hatch Diagram.) The hatch is removable only
into the crew compartment. The reinforced flange on the forward tunnel
ring for the pressure seal and latch engagement prevents an outward
removal. The hatch is retained at the forward end of the CM tunnel by six
separate jointed latches whose linkage is driven by an actuating handle
from within the crew compartment. A drive is provided on the LM side
(outside) opposite the actuating handle drive, permitting hatch removal by
using the B tool of the in-flight tool-set. A pressure equalization valve,
which can be opened or closed from either side, is provided on the hatch.
This valve is used to equalize pressure in the tunnel and LM prior to
hatch removal.
Forward Pressure
Hatch Diagram
The LM hatch is not removable but is hinged to open 75
degrees into the LM crew compartment. (See
Docking System - Major
Assemblies Diagram.) A hatch operating handle is provided on
each side of the hatch on a common shaft. The LM upper hatch is opened by
rotating the handle approximately 90 degrees clockwise from the CM side,
counterclockwise from the LM side. Handle rotation in the opposite
direction is required to re-engage the latching mechanism. A pressure dump
(equalization) valve, manually operable from either side, is provided in
the LM upper hatch. This valve is basically required for pressure dump
capability from the LM cabin.