APOLLO
11 OPERATIONS HANDBOOK BLOCK II SPACECRAFT
VOLUME
l SPACECRAFT DESCRIPTION
SERVICE
PROPULSION SYSTEM (SPS)
Service
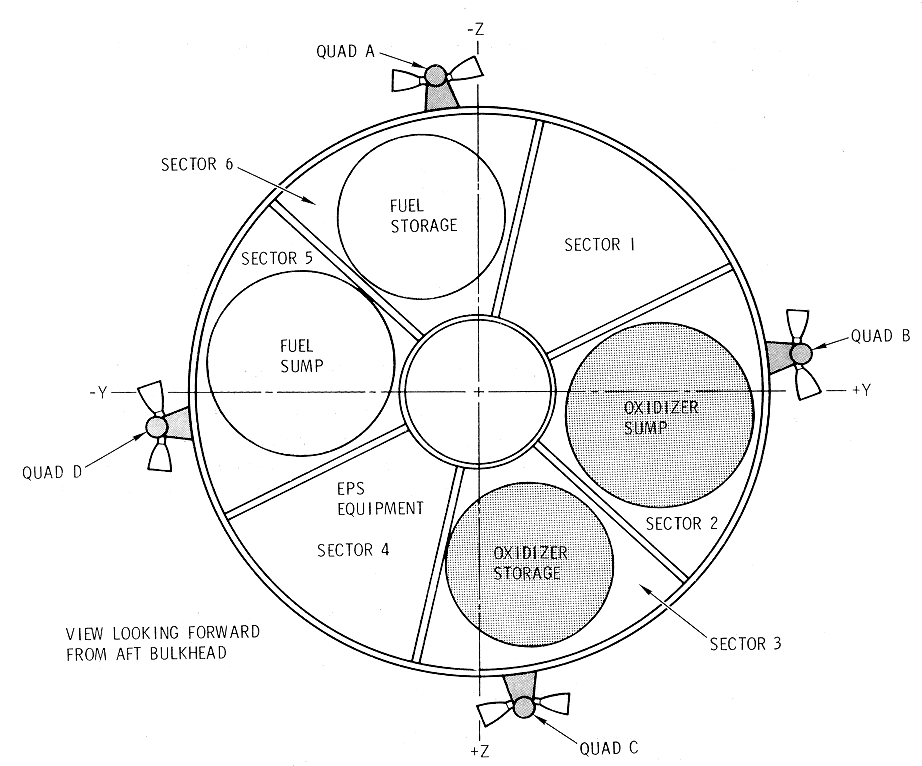
Module Sectors Diagram
MAJOR
COMPONENT /SUBSYSTEM DESCRIPTION
Pressurization
Subsystem (SPS)
Gaseous
Nitrogen (GN2) Pressure Vessels
GN2
Filters (CSM 108 and Subs)
Bipropellant
Valve Assembly Check Valves
SPS
Heater Installation, Tank Feed Lines Diagram
SPS
Heater Installation, Engine Feed Lines Diagram
SPS
Electrical Heaters Diagram
SPS
Oxidizer Engine Feed-Line Temperature Monitoring Schematic
SPS
Electromechanical Gimbal Actuator Diagram
SPS
Yaw Gimbal Actuator Motor and Clutch Control Diagram
SPS
Angles Pitch and Yaw Diagram
Propellant
Utilization and Gauging Subsystem
SPS
Quantity, Sensing, Computing and Indicating System Diagram
Propellant
Utilization Valve and Flag Display Schematic
Quantity
Sensing, Computing, and Indicating System
SPS
Oxidizer Point Sensor Location Diagram
SPS
Fuel Point Sensor Location Diagram
Quantity
Computing and Indicating System Test
Propellant
Utilization Valve Control
Quantity Sensing System
Accuracy
SPS
Electrical Power Distribution
Electrical
Power Distribution Schematic
OPERATIONAL
LIMITATIONS AND RESTRICTIONS
The service propulsion subsystem provides the impulse
for all X -axis velocity changes (delta Vs) throughout a mission and the
SPS abort capability after the launch escape tower is jettisoned. The SPS
consists of a helium pressurization system, a propellant feed system, a
propellant gauging and utilization system, and a rocket engine. The
oxidizer is inhibited nitrogen tetroxide and the fuel is a blended
hydrazine (approximately 50 percent unsymmetrical dimethyl hydrazine and
50 percent anhydrous hydrazine). The pressurizing gas is helium. The
system incorporates displays and sensing devices to permit earth-based
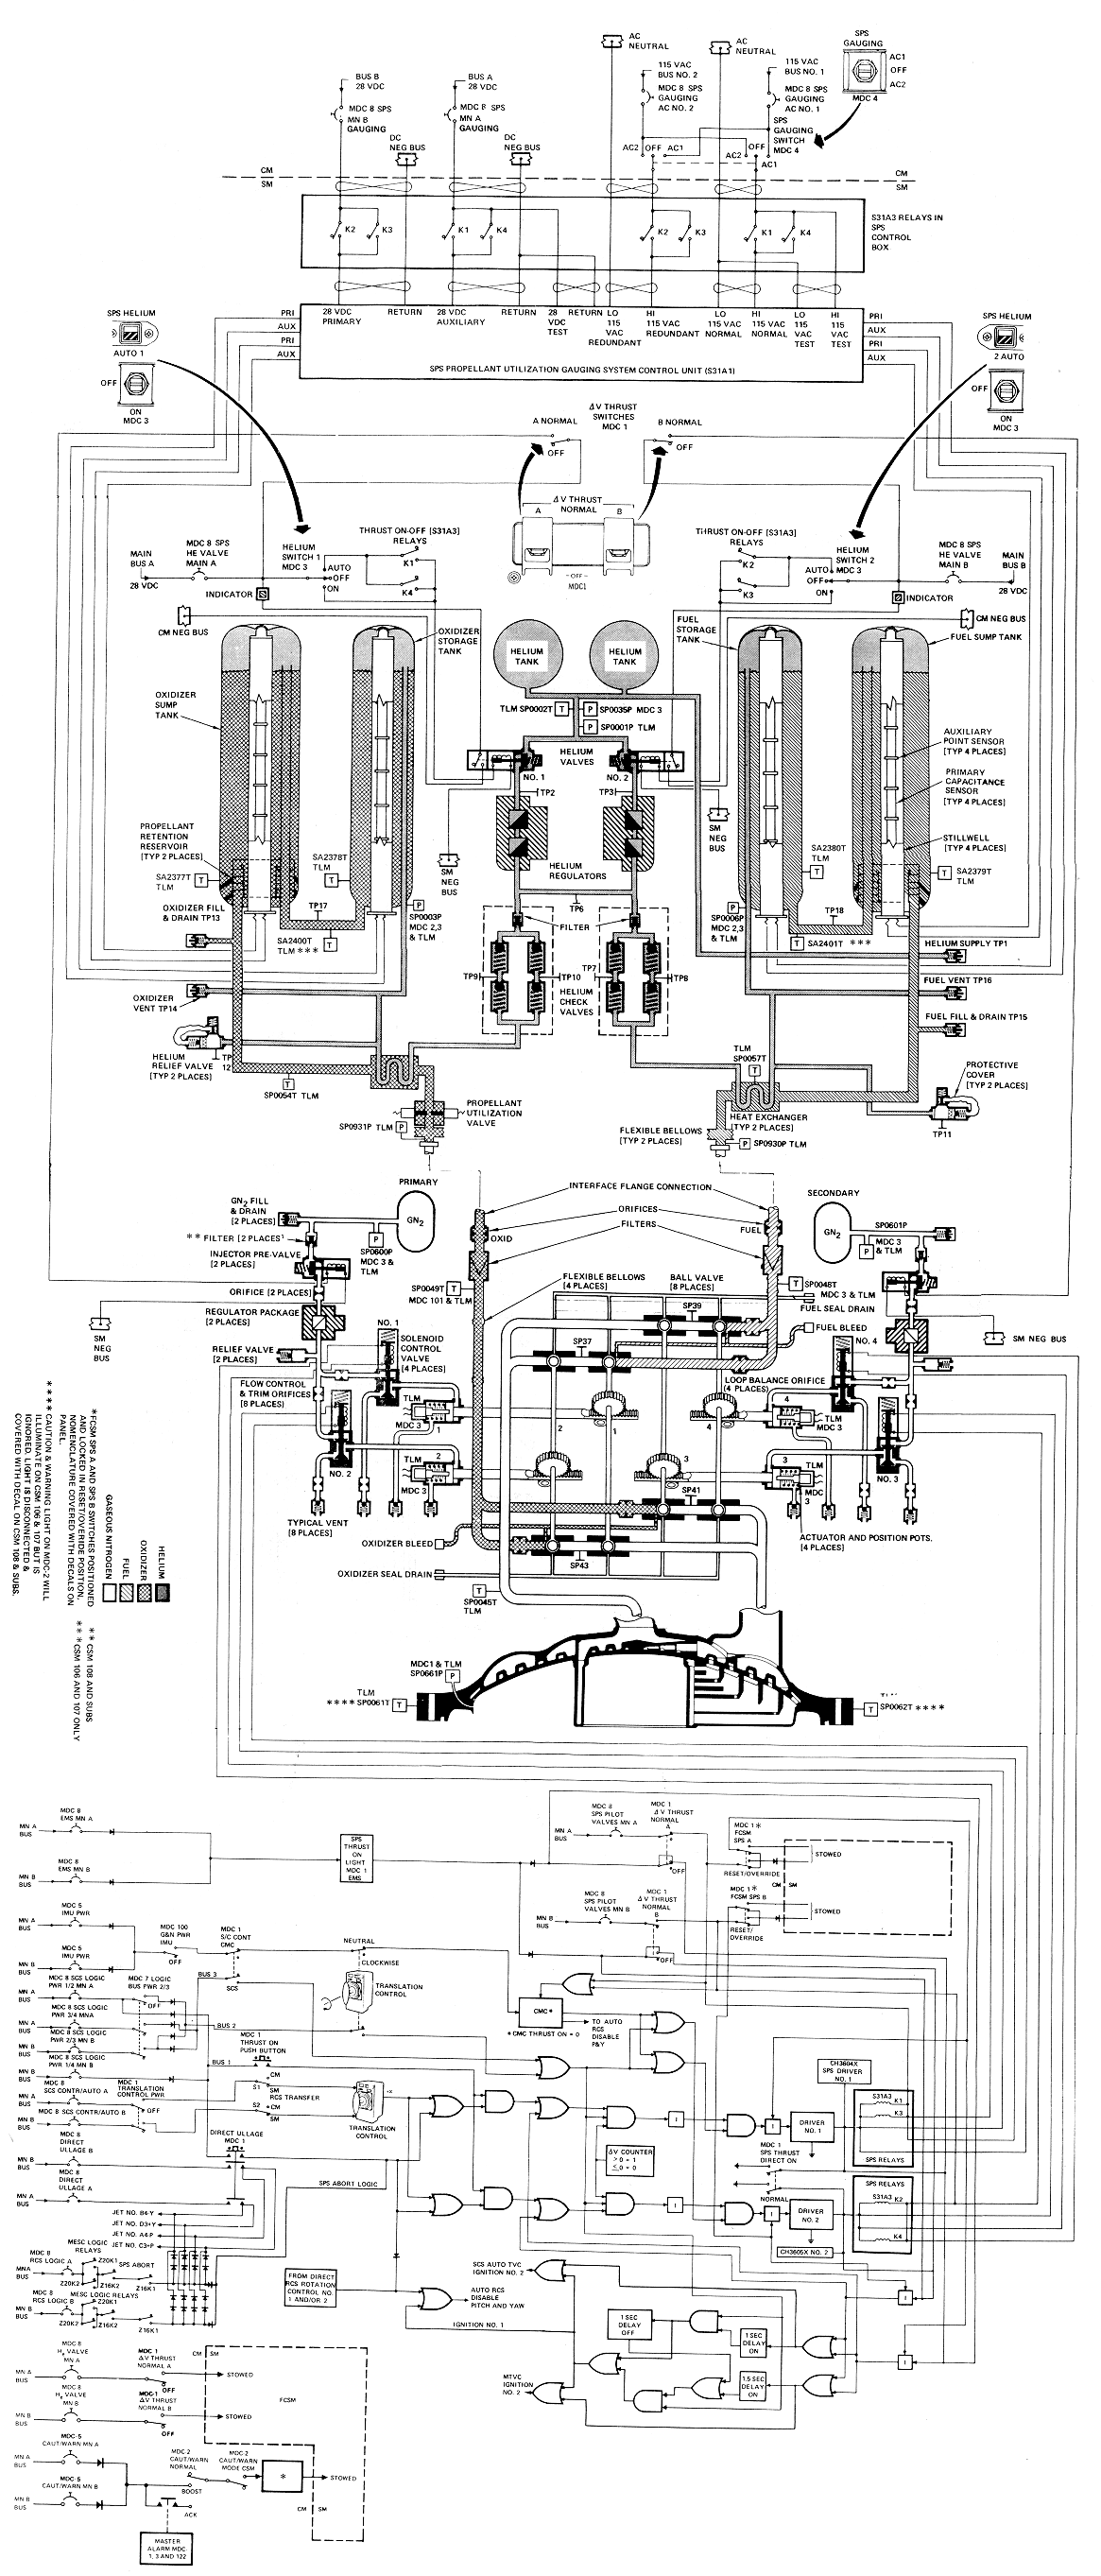
stations and the crew to monitor its operation. (See SPS Functional Flow Diagram.)
SPS Functional Flow
Diagram (106-111)
(111-116)
The helium pressure is directed to the helium
pressurizing valves which isolate the helium during nonthrusting periods,
or allow the helium to pressurize the fuel and oxidizer tanks during
thrusting periods. The helium pressure is reduced at the pressure
regulators to a desired working pressure. The regulated helium pressure is
directed through check valves that permit heliu1n flow in the downstream
direction when the pressurizing valves are open, and p r e vent a reverse
flow of propellants during nonthrusting periods. The heat exchangers
transfer heat from the propellants to the helium gas to reduce any
pressure excursions that may result from a temperature differential
between the helium gas and propellants in the tanks. The relief valves
maintain the structural integrity of the propellant tank systems if an
excessive pressure rise occurs.
The total propellant supply is contained within four
similar tanks; an oxidizer storage tank, oxidizer sump tank, fuel storage
tank, and fuel sump tank (SPS
Functional Flow Diagram, and
Service Module Sectors Diagram).
Th e storage and sump tanks for each propellant system are connected in
series by a single transfer line. The regulated helium enters the fuel and
oxidizer .storage tank, pressurizing the storage tank propellants, and
forces the propellant to an outlet in the storage tank which is directed
through a transfer line into the respective sump tank standpipe
pressurizing the propellants in the sump tank. The propellant in the sump
tank is directed to the exit end into a propellant retention reservoir.
Sufficient propellants are retained in the retention reservoir and at the
tank outlets to permit engine restart capability in a 0-g condition when
the SPS propellant quantity remaining is greater than 22,300 pounds (56.4
%) without conducting an SM RCS ullage maneuver prior to an SPS engine
thrusting period. An ullage 1naneuver is mandatory prior to any SPS
thrusting period when the SPS propellant quantity remaining is at or less
than 22, 300 pounds (56.4 %). An ullage maneuver is also mandatory prior
to any SPS thrusting period following all docked LM DPS burns even though
the SPS propellant quantity is at or greater than 22, 300 pounds (56.4%).
The propellants exit from the respective sump tanks into a single line to
the heat exchanger.
A propellant utilization valve is installed in the
oxidizer line. The propellant utilization valve is powered only during SPS
thrusting periods. The propellant utilization valve aids in achieving
simultaneous propellant depletion. The propellant supply is connected from
the sump tanks to the engine interface flange.
The propellants flow from the propellant sump tank,
through their respective plumbing, to the main propellant orifices and
filters, to the bipropellant valve. The bipropellant valve assembly
contains pneumatically controlled main propellant valves that distribute
the propellants to the engine injector.
The thrust chamber consists of an engine injector,
combustion chamber, and exhaust nozzle extension. The engine injector
distributes the propellants through orifices in the injector face where
the fuel and oxidizer impinge, atomize, and ignite. The combustion chamber
is ablatively cooled. The exhaust nozzle extension is radiation cooled.
The engine assembly is mounted to the structure of the
SM. It is gimbaled to permit thrust vector alignment through the center of
mass prior to thrust initiation and thrust vector control du ring a
thrusting period.
Propellant quantity is measured by two separate sensing
systems: primary and auxiliary. The sensing systems are powered only
during thrust-on periods because of the capacitance and point sensor
measuring techniques. The capacitance and point sensor linearity would not
provide accurate indications during the 0-g nonSPS thrusting periods.
The control of the subsystem is automatic with
provisions for manual backup.
Service Module
Sectors Diagram
MAJOR COMPONENT /SUBSYSTEM DESCRIPTION
Pressurization Subsystem (SPS)
The pressurization subsystem consists of two helium
tanks, two helium pressurizing valves, two dual pressure regulator
assemblies, two dual check valve assemblies, two pressure relief valves,
and two heat exchangers. The critical components are redundant to increase
reliability.
The two helium supply spherical pressure vessels are
located in the center section of the SM.
The helium valves are continuous-duty
solenoid-operated. The valves are energized open and spring-loaded closed.
The SPS He V LV switches ·on MDC-3 permit automatic or manual control of
the valves. With the switches in the AUTO position, the valves are
automatically controlled by a thrust ON-OFF signal. The valves are
controlled manually by placing the switches to the ON (valve open) and OFF
(valve closed) positions.
Each valve contains a position switch which controls a
position (talk-back) indicator above each switch. When the valves are
closed, the position switch is open and the indicator is barber pole
(diagonal lines), the indication during nonSPS thrusting periods. When the
valves are open, the position switch is closed and the indicator is
powered to gray (same color as the panel) indicating the valve is open,
the indication during SPS thrusting periods.
Pressure regulation is accomplished by a
pressure-regulating assembly downstream of each helium pressurizing valve.
Each assembly contains a primary and secondary regulator in series, and a
pressure surge damper and filter installed on the inlet to each regulating
unit.
The primary regulator is normally the controlling
regulator. The secondary regulator is normally open during a dynamic flow
condition. The secondary regulator will not become the controlling
regulator until the primary regulator allows a higher pressure than normal
and allows the secondary regulator to function. All regulator pressures
are in reference to a bellows assembly that is vented to ambient.
Only one of the parallel regulator assemblies regulates
helium pressure under dynamic conditions. The downstream pressure causes
the second assembly to lock up (close). When the regulated pressure
decreases below the lockup pressure of the nonoperating assembly, that
assembly becomes operational.
Each assembly contains four independent check valves
connected in a series- parallel configuration for added redundancy. The
check valves provide a positive checking action against a reverse flow of
propellant liquid and/or vapor, and permit helium pressure to be directed
to the propellant tanks. Filters are incorporated in the inlet to each
check valve assembly and each test port (SPS Functional Flow Diagram).
The pressure relief valves consist of a relief valve, a
burst diaphragm, and a filter.
In the event excessive helium and/or propellant vapor
ruptures the burst diaphragm, the relief valve opens and vents the
applicable system. The relief valve will close and reseal after the
excessive pressure has returned to the operating level. The burst
diaphragm provides a more positive seal of helium than a relief valve. The
filter prevents any fragments from the (nonfragmentation type) diaphragm
from entering onto the relief valve seat.
A pressure bleed device is incorporated between the
burst diaphragm and relief valve. The bleed valve vents the cavity between
the burst diaphragm and relief valve in the event of any leakage from the
diaphragm. The bleed device is normally open and will close when the
pressure increases to a predetermined pressure.
A protective cover is installed over the relief valve
vent port and bleed valve cavity port to prevent moisture accumulation and
foreign matter entrance. The covers are left in place at lift-off.
Each unit is a line-mounted, counterflow heat exchanger
consisting of the helium pressurization line coiled helically within an
enlarged section of the propellant supply line. The helium gas, flowing
through the coiled line, approaches the temperature of the propellant
prior to entry into the respective storage tanks, thus reducing pressure
excursions to a minimum.
This subsystem consists of two fuel tanks (storage and
sump), two oxidizer tanks (storage and sump), and propellant feed lines.
The propellant supply is contained in four
hemispherical-domed cylindrical tanks within the service module (SPS Functional Flow Diagram,
and Service
Module Sectors Diagram). The storage tanks are pressurized by
the helium supply. An outlet transfers the propellant and/or helium gas
from the storage tanks through their respective transfer lines to the sump
tanks. A standpipe in the sump tanks allows the propellant and/ or helium
gas from the storage tanks to pressurize the sump tanks. The propellants
in the sump tanks are directed into retention reservoirs, to the outlet,
and to the engine.
The umbrella retention reservoir, can, and screens are
installed in the exit end of the sump tanks. The reservoir retains a
quantity of propellants at the exit end of the sump tanks and the engine
plumbing during 0-g condition. The reservoir permits engine ignition when
the SPS propellant quantity remaining is greater than 22, 300 pounds (56.
4%) without an ullage maneuver. An ullage maneuver is also required prior
to any SPS thrusting period following all docked LM DPS burns even if the
SPS propellant quantity remaining is at or greater than 22, 3.00 pounds
(56.4%). When the SPS propellant quantity remaining is at 22,300 pounds
(56.4 %) or less, an ullage maneuver is performed prior to an SPS engine
thrusting period to ensure that gas 1s not retained aft of the screens.
The propellant feedlines have flexible bellows
assemblies installed to permit alignment of the tank feed plumbing to the
engine interface plumbing.
The bipropellant valve assembly consists of two gaseous
nitrogen (GN2) pressure vessels, two injector prevalves, two GN2
regulators, two GN2 relief valves, four solenoid control valves, four
actuators, and eight bipropellant ball valves.
Gaseous Nitrogen (GN2) Pressure Vessels
Two GN2 tanks are mounted on the bipropellant valve
assembly to supply pressure to the injector prevalves. One GN2 tank is in
the primary pneumatic control system A and the remaining GN2 tank is in
the secondary pneumatic control system B.
The injector prevalves are two-positive
solenoid-operated valves, one for each pneumatic control system, and are
identified as A and B. The valve is energized open and spring-loaded
closed. The injector prevalves are controlled by the delta V THRUST NORMAL
switches on MDC-1. When switch A is placed to NORMAL, injector prevalve A
is energized open. If switch B is placed to NORMAL, injector prevalve B is
energized open. Th e injector prevalves, when energized open, allow GN2
supply tank pressure to be directed through an orifice, into a regulator,
relief valve, and to a pair of solenoid control valves. The solenoid
control valves are controlled by the SPS thrust ON-OFF commands. The OFF
position of the 6V THRUST switches de-energizes the injector prevalves and
springloads closed.
The delta V TRUST NORMAL switch A receives power from
SPS HE VALVE A circuit breaker on MDC-8 for control of the injector
prevalve A. The delta V T HRUST NORMAL switch B receives power from SPS HE
VALVE B circuit breaker on MDC-8 for control of the injector prevalve B (SPS
Functional Flow Diagram).
The delta V THRUST NORMAL switches, A and/or B, also
provide enabling power for the thrust ON-OFF logic circuitry.
GN2 Filters (CSM 108 and Subs)
A filter is installed between each GN2 pressure vessel
and injector prevalve (SPS
Functional Flow Diagram). A filter is also installed on each
GN2 regulator outlet test port.
A single-stage regulator is installed in each pneumatic
control system between the injector prevalves and the solenoid control
valves. The regulator reduces the supply GN2 pressure to a desired working
pressure.
A pressure relief valve is installed in each pneumatic
control system downstream of the GN2 pressure regulators. This limits the
pressure applied to the solenoid control valves in the event a GN2
pressure regulator mal functioned open.
The orifice between the injector prevalve and regulator
is installed to restrict the flow of GN2 and allow the relief valve to
relieve the pressure overboard in the event the regulator malfunctions
open, preventing damage to the solenoid control valves and/or actuators.
Four solenoid-operated three-way two-position control
valves are utilized for actuator control. Two solenoid control valves are
located downstream of the GN2 regulators in each pneumatic control system.
The solenoid control valves in the primary system are identified as 1 and
2 and the two in the secondary system are identified as 3 and 4. The
solenoid control valves in the primary system control actuator and ball
valves 1 and 2. The two solenoid control valves in the secondary system
control actuator and ball valves 3 and 4. The SPS thrust ON-OFF command
controls the energizing or de-energizing of the solenoid control valves.
Solenoid control valves 1 and 2 are energized by the SPS thrust ON-OFF
command if delta V THRUST NORMAL switch A is placed to A. Solenoid control
valves 3 and 4 are energized by the SPS thrust ON-OFF command if delta V
THRUST NORMAL switch B is placed to B.
Four piston-type, pneumatically operated actuators are
utilized to control the eight propellant ball valves. Each actuator piston
is mechanically connected to a pair of propellant ball valves, one fuel
and one oxidizer. When the solenoid control valves are opened, pneumatic
pressure is applied to the opening side of the actuators. The spring
pressure on the closing side is overcome and the actuator piston moves.
Utilizing a rack and pinion gear, linear motion of the actuator connecting
arm is converted into rotary motion, which opens the propellant ball
valves. When the engine firing signal is removed from the solenoid control
valves, the solenoid control valves close, removing the pneumatic pressure
source from the opening side of the actuators. The actuator closing side
spring pressure now forces the actuator piston to move in the opposite
direction, causing the propellant ball valves to close. The piston
movement forces the remaining GN2, on the opening side of the actuator,
back through the solenoid control valves where it is vented overboard.
Each actuator incorporates a pair of linear position
transducers. One supplies ball valve position information to the SPS
ENGINE INJECTOR VALVES indicators on MDC-3. The output of the second
transducer supplies ball valve position information to telemetry.
The eight propellant ball valves are used to distribute
fuel and oxidizer to the engine injector assembly. Each pair, of four
linked pairs, consists of one fuel and one oxidizer ball valve that is
controlled by a single actuator. The four linked pairs are arranged in a
series-parallel configuration, SPS
Functional Flow Diagram. The parallel redundancy ensures
engine ignition; the series redundancy ensures thrust termination. When
GN2 pressure is applied to the actuators, each propellant ball valve is
rotated, aligning the ball to a position that allows propellants to flow
to the engine injector assembly. The mechanical arrangement is such that
the oxidizer ball valves maintain an 8-degree lead over the fuel ball
valves upon opening, which results in smoother engine starting transients.
Bipropellant Valve Assembly Check Valves
Check valves are installed in the vent port outlet of
each of the four solenoid control valves, spring pressure vent port of the
four actuators, and the ambient vent port of the two GN2 pressure
regulator assemblies. Thus, the seals of the components are protected from
a hard vacuum in space.
Integral propellant lines are utilized on the engine to
route each propellant from the interface points, in the gimbal plane area,
to the bipropellant valve assembly. The plumbing consists of flexible
bellows that permit propellant line flexibility for engine gimbaling,
orifices for adjustment of oxidizer /fuel ratio, and screens to prevent
particle contaminants from entering the engine.
The injector is bolted to the ablative thrust chamber
attach pad. Propellant distribution through the injector is accomplished
through concentric annuli machined orifices in the face of the injector
assembly and covered by concentric closeout rings. Propellant distribution
to the annuli is accomplished through alternate radial manifolds welded to
the backside of the injector body. The injector is baffled to provide
combustion stability. The fuel and oxidizer orifices impinge, atomize, and
ignite because of hypergolic reaction.
The ablative combustion chamber material extends from
the injector attach pad to the nozzle extension attach pad. The ablative
material consists of a liner, a layer of insulation, and integral metal
attach flanges for mounting the injector.
The bell- contoured nozzle extension is bolted to the
ablative thrust chamber exit area. The nozzle extension is radiant-cooled
and contains an external stiffener to provide additional strength.
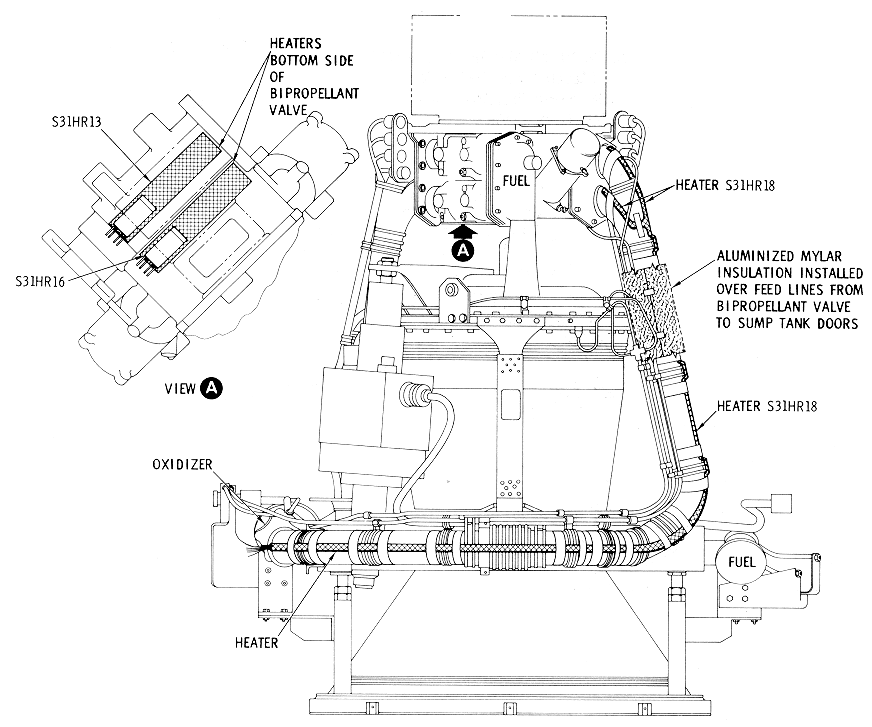
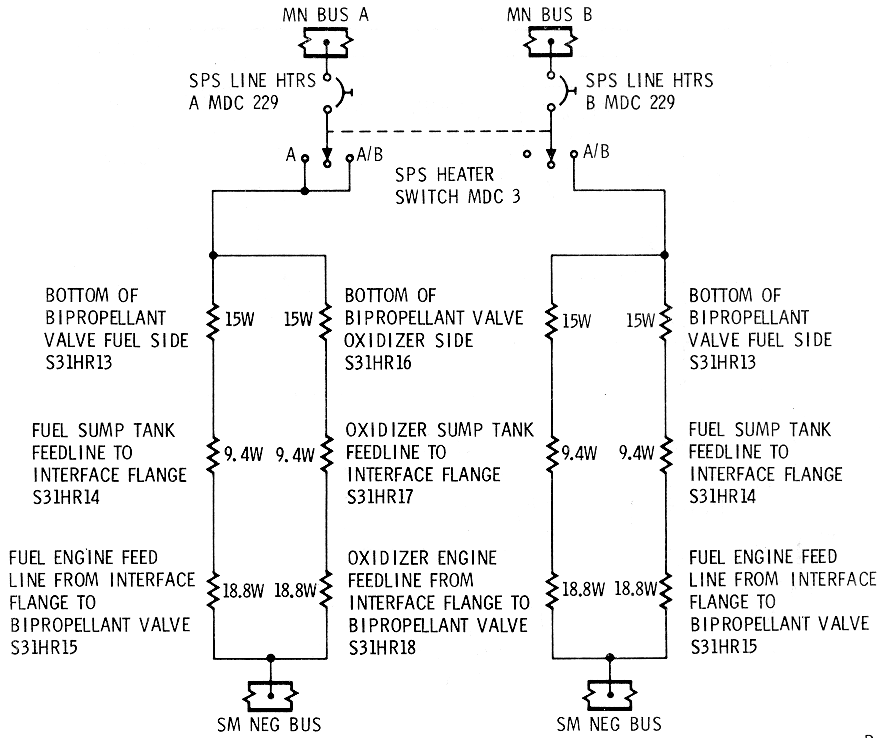
There are six electrical heaters installed on the tank
feed lines fron1 the respective sump tank outlets to the interface flange,
on the respective engine feed lines from the interface flange to the
bipropellant valve assembly and on the bottom side of the bipropellant
valve assembly (SPS
Heater Installation, Tank Feed Lines Diagram
and SPS
Heater Installation, Engine Feed Lines Diagram). Each heater
contains a redundant element. These electrical heaters provide h eat to
the tank feed lines, engine feed lines and bipropellant valve assembly,
thus to the propellants. The heaters are controlled as a normal manual
function of the crew on MDC- 3 (SPS Electrical Heaters Diagram)
utilizing the SPS LINE HTRS switch. When the switch is placed to position
A/B, power is supplied to 12 elements. When the switch is placed to
position A, power is supplied to 6 elements. The switch is placed to
position A/B or A when the SPS PRPLNT TANKS TEMP indicator on MDC-3 reads
+45° F. Temperature is derived from the engine fuel line temperature
sensor (SPS
Functional Flow Diagram). The switch is placed to OFF when the
indicator reads + 75 °F. The red-line markings on the indicator are +27 °F
and +100 °F, respectively.
SPS Heater
Installation, Tank Feed Lines Diagram
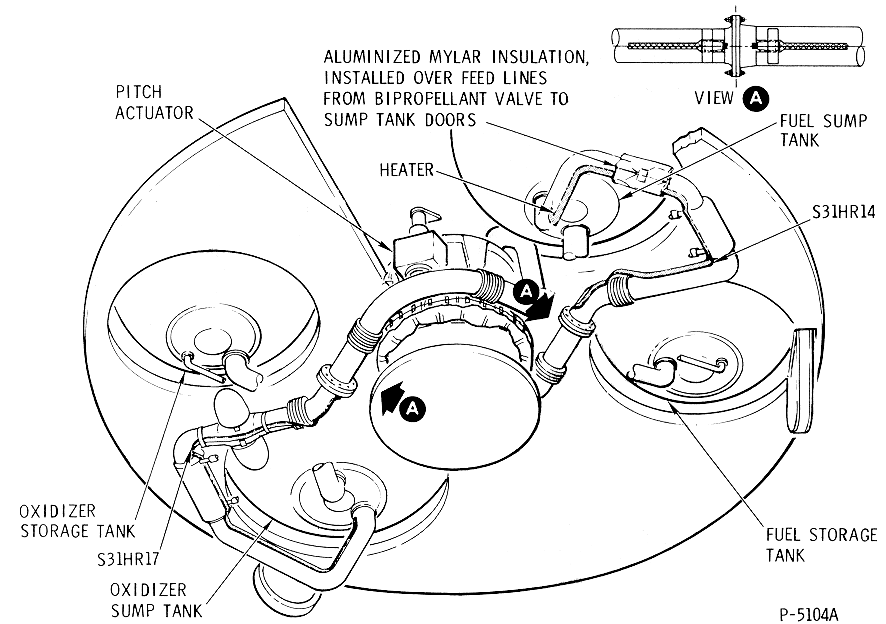
SPS Heater
Installation, Engine Feed Lines Diagram
SPS Electrical
Heaters Schematics
The engine oxidizer feed-line temperature (SPS Functional Flow Diagram)
may be utilized as a back-up to the SPS PRPLNT TANKS TEMP indicator on
MDC-3. The engine oxidizer feed-line temperature may be monitored on
MDC-101 (SPS
Oxidizer Engine Feed-Li ne Temperature Monitoring Schematic).
SPS Oxidizer Engine
Feed-Line Temperature Monitoring Schematic
The thrust mount assembly consists of a gimbal ring,
engine-to-vehicle mounting pads, and gimbal ring- to- combustion chamber
assembly support struts. The thrust structure is capable of providing ±10
degrees inclination about the Z-axis and ±6 degrees about the Y-axis.
Thrust vector control of the service propulsion engine
is achieved by dual, servo, electromechanical actuators. The gimbal
actuators are capable of providing control around the Z - Z axis (yaw) of
±4.5 (+0.5, -0.0) degrees in either direction from a + 1-degree null
offset during SPS thrusting periods (0-degree null offset during non SPS
thrusting periods), and around the Y - Y axis (pitch) of ±4.5 (+0.5, -0.0)
degrees in either direction from a +2-degree null offset during SPS
thrusting periods (+1.5-degree null offset during non SPS thrusting
periods).
The reason for the + 1-degree null offset to the +Y
axis and + 2-degree offset to the +z axis during SPS thrusting periods, is
the offset center of mass. The reason for the change in the null offset
positions from an SPS non-thrusting period to an SPS thrusting period is
due to the structural and engine deflections that occur when thrust-on is
provided to the SPS engine.
Each actuator assembly (SPS Electromechanical Gimbal
Actuator Diagram) consists of four electromagnetic particle
clutches, two d-c motors, a bull gear, jack-screw and ram, ball nut, two
linear position transducers, and two velocity generators. The actuator
assembly is a sealed unit and encloses those portions protruding from the
main housing.
SPS
Electromechanical Gimbal Actuator Diagram
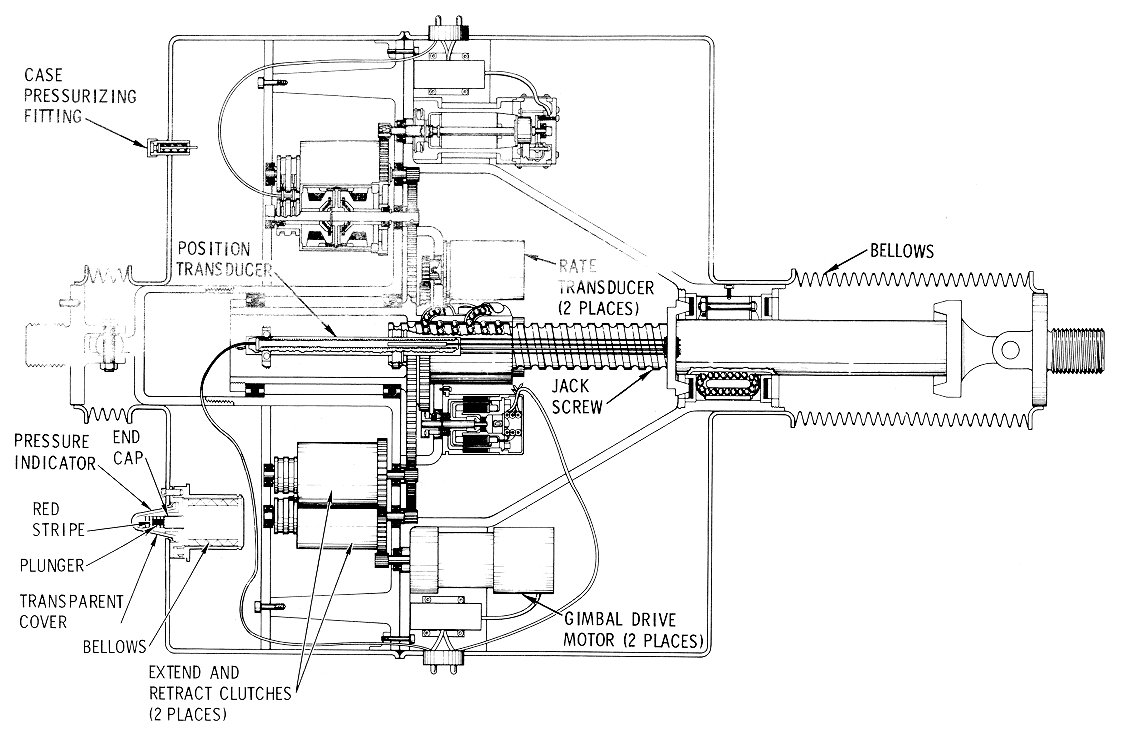
One motor and a pair of clutches (extend and retract)
are identified as systen1 No. 1, the remaining motor and pair of clutches
(extend and retract) are identified as system No. 2 within the specific
actuator.
An overcurrent monitor circuit is employed for each
primary and secondary gimbal motor. Each gimbal motor and overcurrent
monitor circuit is controlled by its own SPS Gll'v1BAL MOTORS switch on
MDC- 1. There are four SPS GIMBAL MOTORS switches, PITCH 1 and 2 and YAW 1
and 2. The SPS
Yaw Gimbal Actuator Motor and Clutch Control Diagram
illustrates the yaw actuator as an example. When the SPS GIMBAL M0TORS YAW
1 (primary) switch is positioned to START, power is applied from the
battery bus to the motor-driven switch. The motor- driven switch closes a
contact that allows power from the main bus to the gimbal motors. Thus,
the gimbal motor is started. When the SPS GIMBAL MOTORS YAW 1 switch is
released, it springs back to the center position. The center position
activates the overcurrent monitor sensing circuitry. The SPS GIMBAL MOTORS
YAW 2 (secondary) switch is then positioned to START. The SPS GIMBAL MO
TORS YAW 2 switch activates yaw Z motor-driven switch. The motor-driven
switch of YAW 2 functions as with YAW 1. The SPS GIMBAL MOTORS YAW 2
switch released from START, spring loads to center. The center position
activates the overcurrent monitor circuit of yaw 2.
SPS Yaw Gimbal
Actuator Motor and Clutch Control Diagram
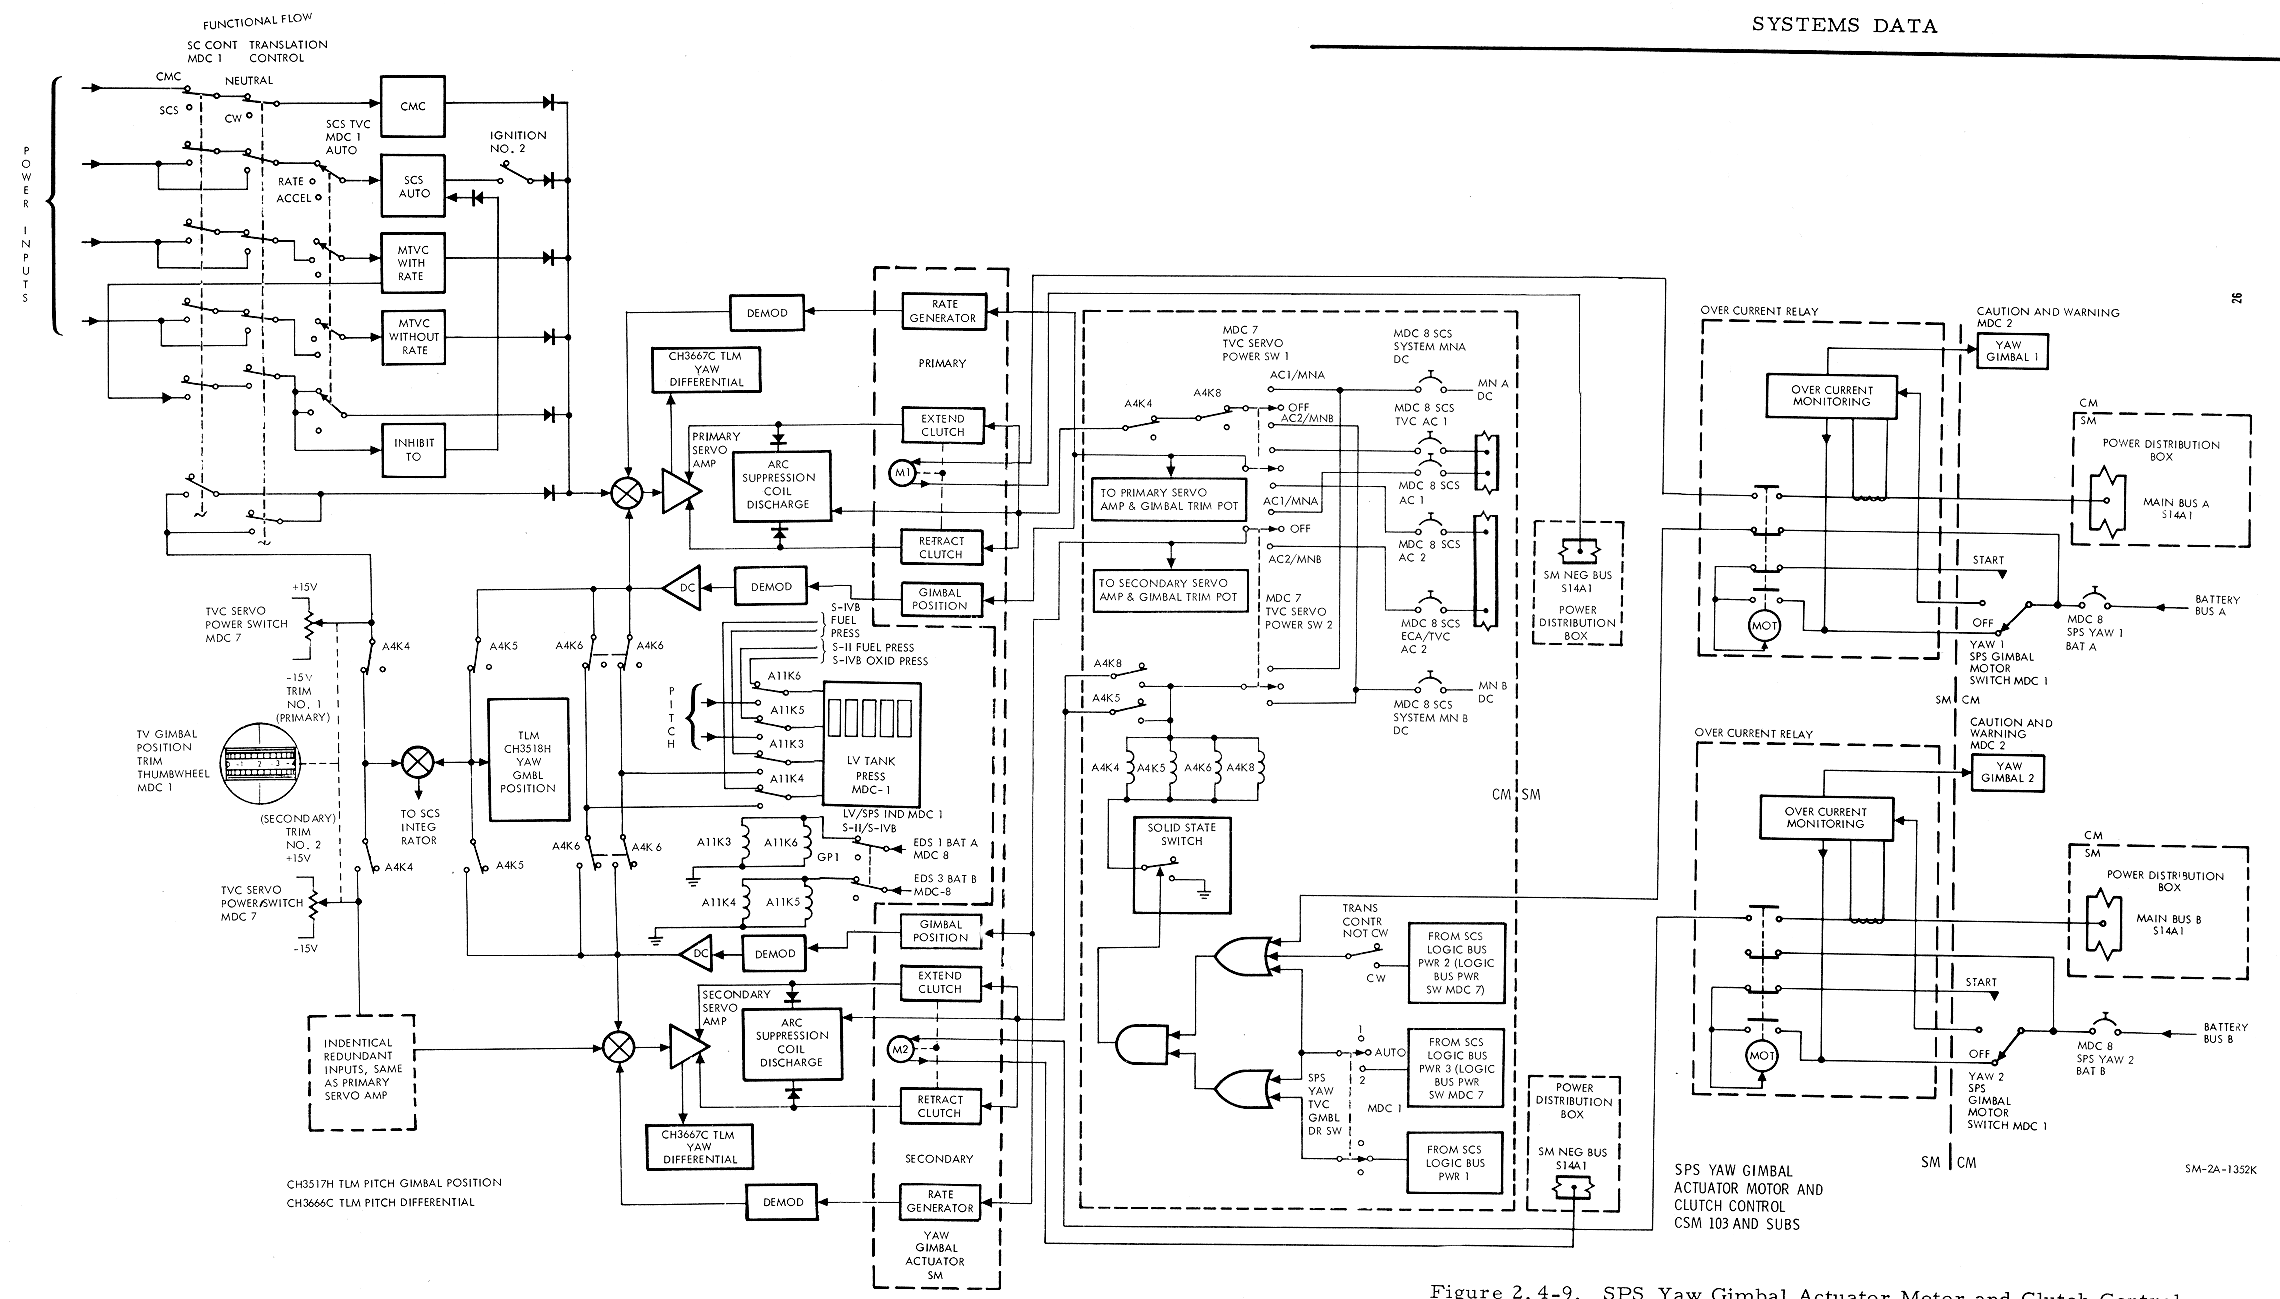
The overcurrent monitor circuits of the primary and
secondary system are utilized to monitor the current to the gimbal motors.
This is because of the variable current flow during the initial gimbal
motor start, normal operation for the main d-c bus, and gimbal motor
protection.
Using the No. 1 yaw system as an example, identify the
upper motor and clutches in
SPS Electromechanical Gimbal
Actuator Diagram and
SPS
Yaw Gimbal Actuator Motor and Clutch Control Diagram
as system No. 1. When the overcurrent monitoring senses an overcurrent
on gimbal motor No. 1, the following functions occur. The overcurrent
monitor circuitry drives the motor-driven switch. This removes power from
gimbal motor No. 1, rendering it inoperative. Simultaneously, a signal is
sent to illuminate the YAW GMBL DR 1 caution and warning light on MDC-2.
This informs the crew the YAW gimbal motor No. 1 has failed due to
overcurrent. Simultaneously, a fail sense signal is sent from a contact on
the motor driven switch. The fail sense signal is sent through an OR and
AND gate to a solid-state switch. This switch provides a ground for relay
coils A4K4, A4K5, A4K 6 and A4K8. These relays are energized if the TVC
GMBL DRIVE YAW s witch on MDC -1 is in AUTO and the SCS TVC SERVO POWER
switch 2 on MDC - 7 is in AC2 /MNB or AC1 /MNA. This allows the upper
relay contacts of A4K4 and A4K8 to open and removes the power input to the
No. 1 clutches.
Simultaneously, the lower relay contacts of A4K5 and
A4K8 close. This applies power inputs to the No. 2 clutches within the
same actuator. Simultaneously, the upper contacts of A4K4, A4K5, and A4K6
open and the lower contacts close, allowing thrust vector control
monitoring. The SPS GIMBAL MOTORS YAW 1 switch on MDC-1 is then positioned
to OFF. Normally, the OFF position is used to shut down the gimbal motor
upon completion of a thrusting period.
Using No. 2 yaw system as an example, identify the
lower motor and clutches in
SPS Electromechanical Gimbal
Actuator Diagram and
SPS
Yaw Gimbal Actuator Motor and Clutch Control Diagram
as system No. 2. Then the overcurrent monitoring senses an overcurrent
on gimbal motor No. 2, the following functions occur. The overcurrent
monitor circuitry will drive the motor-driven switch. This removes power
from gimbal motor No. 2, rendering it inoperative. Simultaneously, a
signal is sent to illuminate the YAW GMB L DR 2 caution and warning light
on MDC-2. This informs the crew the YAW gimbal motor No. 2 has failed due
to overcurrent. There is no fail sense signal sent to control relay coil s
A4K4, A4K5, A4K6, and A4K8. If the No. 2 gimbal motor has failed as well
as No. 1 gimbal motor, that specific actuator is inoperative. The SPS
GIMBAL MOTORS YAW 2 switch on MDC- 1 is then positioned to O FF. Normally,
the OFF position is used to shut down the gimbal motor upon completion of
a thrusting period.
The LV /SPS IND switch on MDC-1 when positioned to GPI
de-energizes relay coils A11K3, A11K4, A11K5, and A11K6 (SPS Yaw Gimbal Actuator Motor and
Clutch Control Diagram). This allows the relay contact points
of A11K3, A11K4, A11K5, and A11K6 to move to the down position. The
actuator position transduce r is then allowed to transmit gimbal position
information to the SPS GPI on MDC - 1.
The TVC GMB L DRIVE YAW switch on MDC- 1 will also
control through the OR and AND gate the solid-state switch (SPS Yaw Gimbal Actuator Motor and
Clutch Control Diagram). T he solid-state switch will provide
the ground for relay coils A4K4, A4K5, A 4K6, and A4K8. The power input to
these relays is provided by positioning the TVC SER VO POWER switch 2 on
MDC-7 to AC 2/ MNB or ACl/MNA. When the TVC GMBL DRIVE YAW switch is in
AUTO, the primary gimbal motor overcurrent monitor circuitry controls the
solid-state-switch. If overcurrent on the primary gimbal motor is sensed,
the CMC, SGS or MTVC inputs are switched automatically from the primary to
the secondary clutches.
If the TVC GMBL DRIVE YAW switch on MDC - 1 is in
position 1, the CMC, SCS, or MTVC inputs are locked into the primary
clutches. If overcurrent is sensed on gimbal motor No. 1, or if the
translation control is rotated clockwise, there is no automatic switchover
from the primary to secondary clutches. The TVC GMB L DRIVE YAW switch
positioned to 1 could be utilized to check out gimbal motor No. 1, the
primary clutches, and the primary servo loop system.
If the TVC GMBL DRIVE YAW switch on MDC-1 is in
position 2 and the T VC SERVO POWER switch 2 on MDC-7 is in AC2/MNB or AC
1 /MNA position. The CMC, SCS or MTVC inputs are locked into the secondary
clutches. This position could be utilized to check out gimbal motor No. 2,
the secondary clutches, and the secondary servo loop system.
If the TVC GMB L DRIVE YAW switch on MDC-1 is in AUTO
and TVC SERVO POWER switch 2 on MDC-7 is in AC2/MNB or AC1 /MNA position.
The SCS or MTVC inputs are removed from the primary clutches and switched
to the secondary clutches when the translation control is rotated
clockwise.
The pitch gimbal actuator operation and control
function in the same manner as yaw. The pitch gimbal actuator control
circuits has its own PITCH GIMBAL MOTOR switches on MDC-1 and its own TVC
GIMBL DR PITCH Switch on MDC- 1. The T VC SERVO POWER switches on MDC-7
will supply power to the pitch clutches as in the case of the yaw,
clutches. The LV /SPS IND switch to GPI on MDC -1 allows pitch gimbal
position to the GPI. The relay coils, however, will have different numbers
in the pitch actuator.
It is noted that the primary yaw and pitch gimbal motor
receive power from MN BUS A. The primary pitch and yaw motor-driven
switches receive power from BAT BUS A. Th e secondary yaw and pitch gimbal
motors receive power from MN BUS B. The secondary pitch and yaw
motor-driven switches receive power fron1 BAT BUS A.
The clutches are of a magnetic-particle type. The
gimbal motor drive gear meshes with the gear on the clutch housing. The
gears on each clutch housing mesh and as a result, the clutch housings
counter rotate. The current input is applied to the electromagnet mounted
to the rotating clutch housing from the SCS, CMC, or MTVC. A quiescent
current may be applied to the electromagnet of the extend and retract
clutches when the TVC SERVO POWER switches, on MDC-7, are in AC1/MNA or
AC2/MNB, preventing any movement of the engine during the boost phase of
the mission with the gimbal motors OFF. The gimbal motors will be turned
ON prior to jettisoning the launch escape tower to support the SPS abort
after the launch escape tower has been jettisoned and will be turned OFF
as soon as possible to reduce the heat that occurs due to the gimbal motor
driving the clutch housing with quiescent current applied to the clutch.
The friction force in the clutch housing creates heat which if allowed to
increase to a high temperature, the electromagnet would loose its
magnetism capability, thus rendering that set of clutches inoperative.
Prior to any SCS delta V thrusting period or in MTVC
(manual thrust vector control), the thumbwheels on MDC-1 will be used to
position the engine. The thumbwheels may be positioned prior to any CMC
delta V thrusting period but cannot position the engine. In any thrusting
mode, the current input required for a gimbal angle change (to maintain
the engine thrust vector through the center of mass) to the clutches will
increase above the quiescent current. This increases the current into the
electromagnets that are rotating with the clutch housings. The dry powder
magnetic particles have the ability to become magnetized very readily, as
well as demagnetized just as readily. The magnetic particles increase the
friction force between the rotating housing and the flywheel, causing the
flywheel to rotate. The flywheel arrangement is attached to the clutch
output shaft allowing the clutch output shaft to drive the bull gear. The
bull gear drives a ball nut which drives the actuator jackshaft to an
extend or retract position, depending upon which clutch housing
electromagnet the current input is supplied to. The larger the excitation
current, the higher the clutch shaft rotation rate.
Meshed with the ball nut pinion gear are two rate
transducers. The transducers are a tachometer type. When the ball nut is
rotated, the rate transducer supplies a feedback into the summing network
of the thrust vector control logic to control the driving rates of the
jackscrew (acting as a dynamic brake to prevent over- or
under-correcting). There is one rate transducer for each system.
The jackscrew contains two position transducers, all
arranged for linear motion and all connected to a single yoke. The
position transducers are used to provide a feedback to the summing network
and the visual display on MDC-1. The operating system provides feedback
into the summing network reducing the output current to the clutch
resulting in proportional rate change to the desired gimbal angle position
and returns to a quiescent current in addition to providing a signal to
the visual display on MDC-1.
The remaining position transducer provides a feedback
to the redundant summing network of the thrust vector logic for the
redundant clutches in addition to the visual display on MDC- 1 if the
secondary system is the operating system.
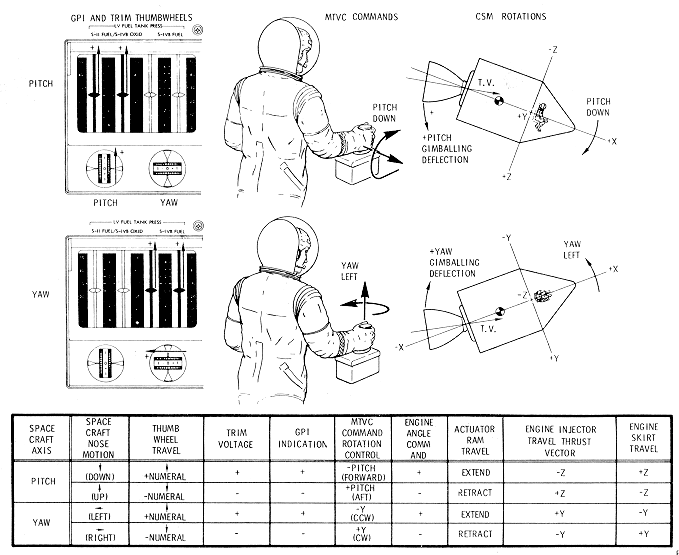
The spacecraft desired motion, thumbwheel positioning,
rotation control (MTVC), engine nozzle position, thrust vector position,
gimbal position display indicator, and actuator ram movement is identified
in
SPS Angles Pitch and Yaw Diagram
and
SPS Gimbaling Diagram.
SPS Angles Pitch
and Yaw Diagram
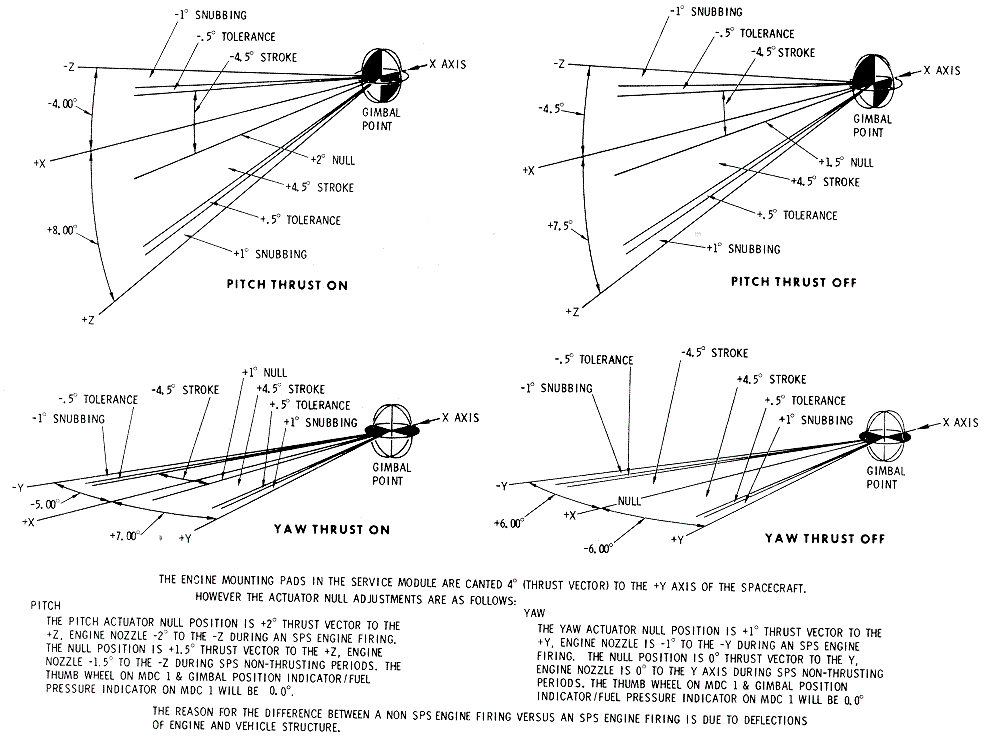
A snubbing device provides a hard stop for an
additional one-degree travel beyond the normal gimbal limits.
Propellant Utilization and Gauging Subsystem (PUGS)
The subsystem consists of a primary and auxiliary
sensing system, a propellant utilization valve, a control unit, and a
display unit (SPS
Quantity, Sensing, Computing and Indicating System Diagram
and Propellant Utilization Valve and
Flag Display Schematic).
SPS Quantity,
Sensing, Computing and Indicating System Diagram
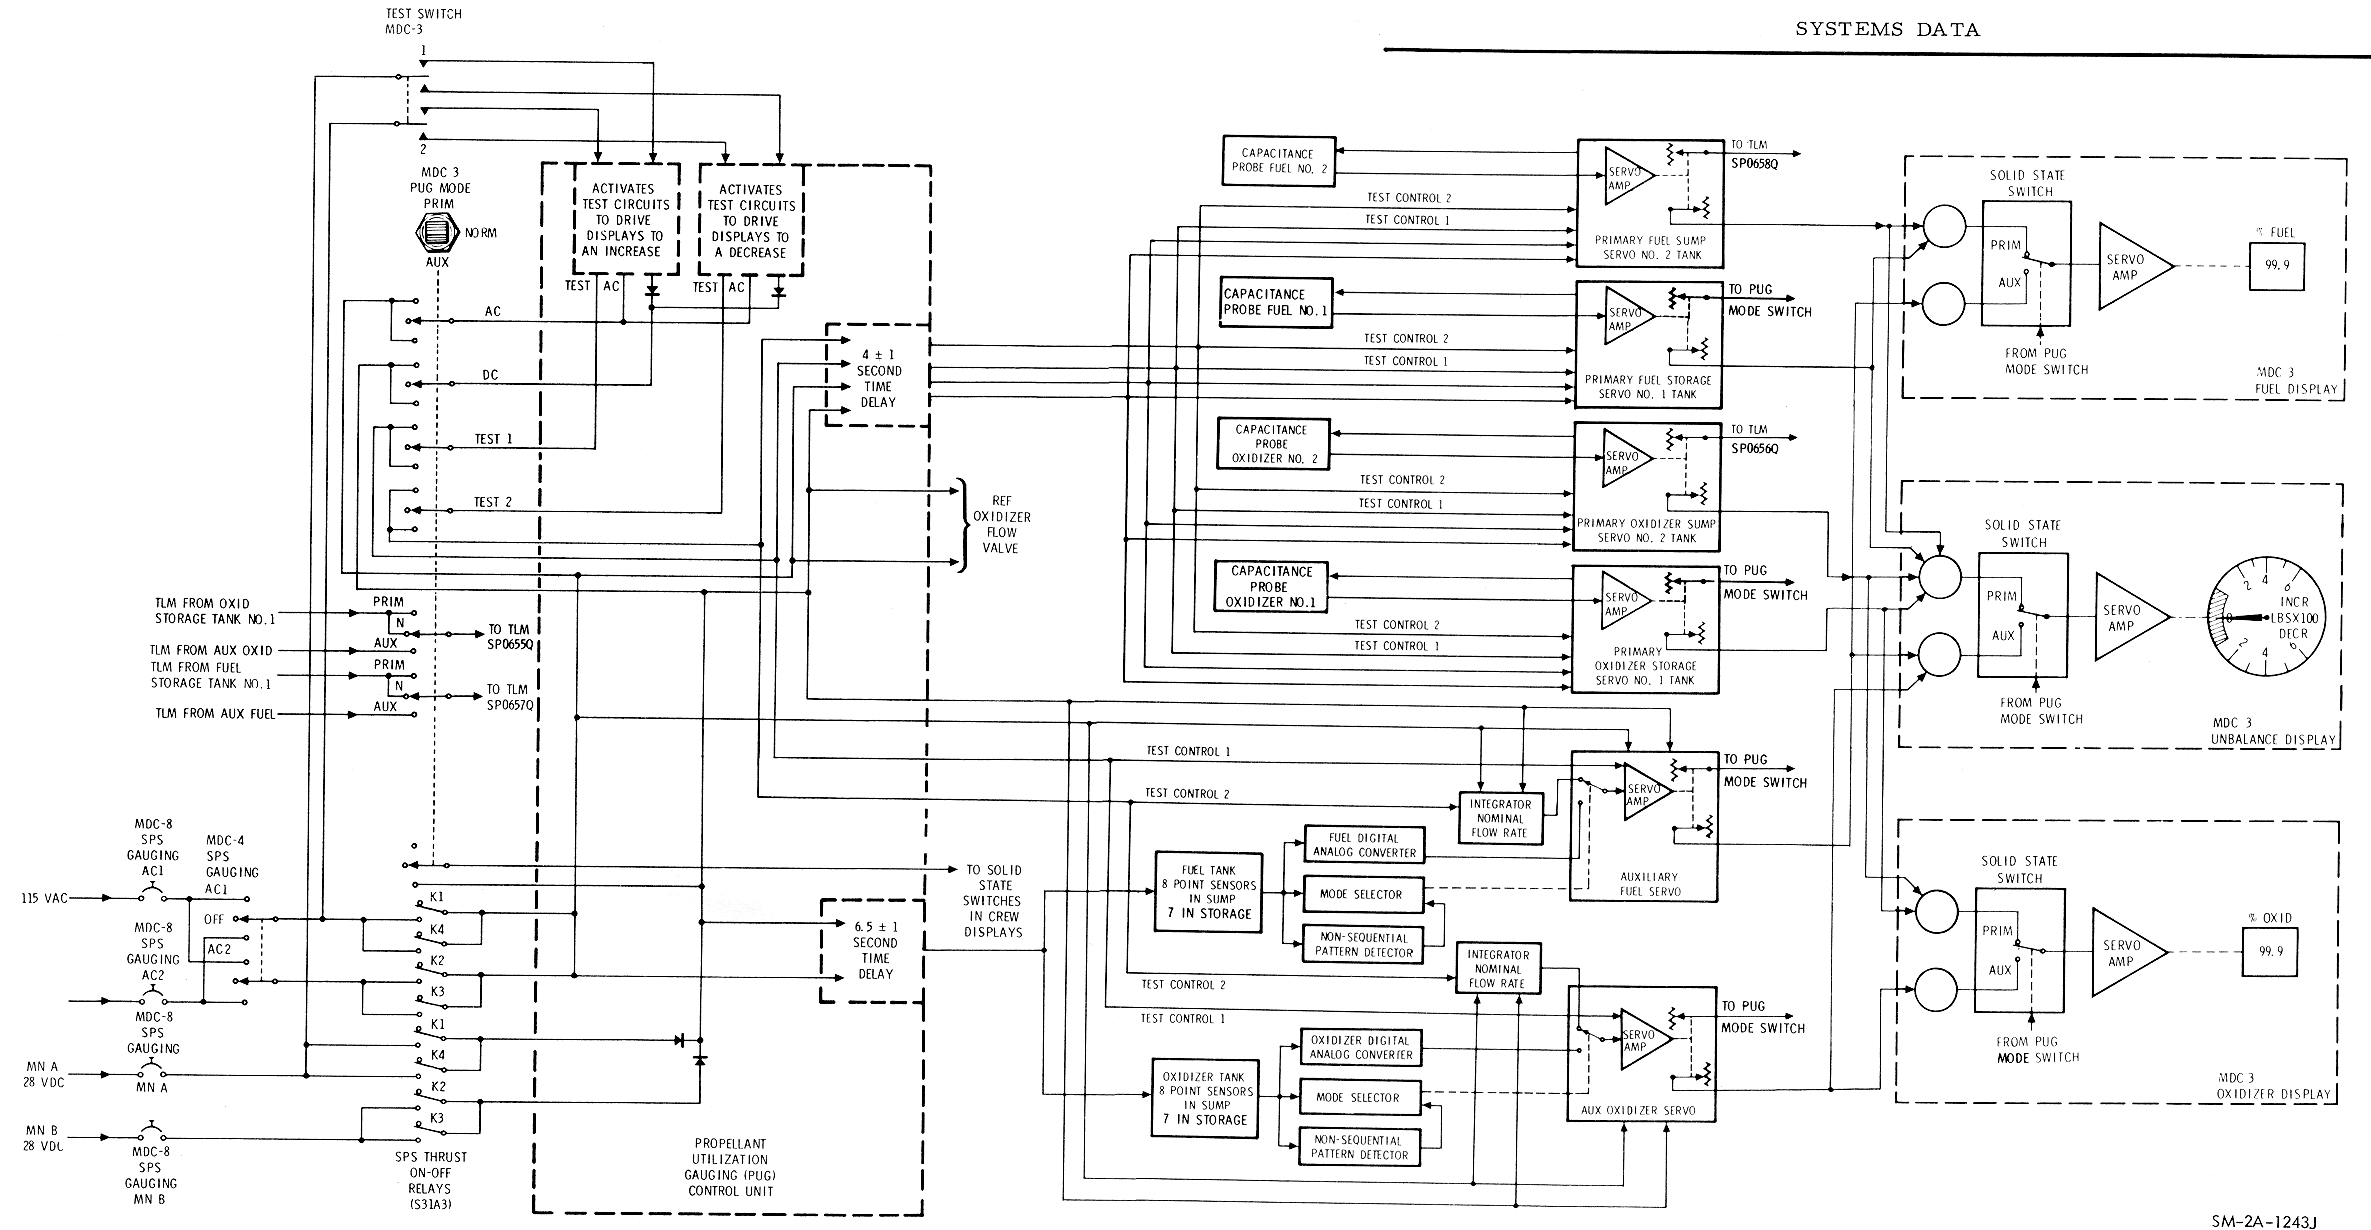
Propellant
Utilization Valve and Flag Display Schematic
Quantity Sensing, Computing, and Indicating System
Propellant quantity is measured by two separate sensing
systems, primary and auxiliary. The primary quantity sensors are
cylindrical capacitance probes, mounted axially in each tank. In the
oxidizer tanks, the probes consist of a pair of concentric electrodes with
oxidizer used as the dielectric. In the fuel tanks, a pyrex glass probe,
coated with silver on the inside, i s used as one conduct or of the
capacitor. Fuel on the outside of the probe i s the other conductor. The
pyrex glass itself forms the dielectric. The auxiliary system utilizes
point sensors mounted a t intervals along the primary p robes to provide a
step Junction impedance change when the liquid level passes their location
centerline.
Primary propellant measurement is accomplished by the
probes capacitance, being a linear function of propellant height.
Auxiliary propellant measurement is accomplished by
locating the propellant level, with point sensors, seven in the storage
tanks and eight in the sump tanks. Each point sensor consists of
concentric metal rings. The rings present a variable impedance depending
on whether the y are covered or uncovered by the propellants. When the
propellants are between point sensors, the propellants remaining are
integrated by a rate flow generator which integrates the servos at a r ate
proportional to the nominal flow rate of the fuel and oxidizer. A mode
selector senses when the propellant crosses a sensor and changes the
auxiliary servos from the flow r ate generator mode to the position mode,
the system moves to the location specified by the digital-to-analog
converter for 0. 9 seconds to correct for any difference. The system then
returns to the flow rate generator mode until the next point sensor is
reached. The SPS
Oxidizer Point Sensor Location Diagram
and SPS Fuel Point Sensor Location
Diagram identify
the point sensor locations. The non-sequential pattern detector functions
to detect false or faulty sensor signals. If a sensor has failed, the
information from that sensor is blocked from the system, preventing
disruption of system computation.
SPS Oxidizer Point
Sensor Location Diagram
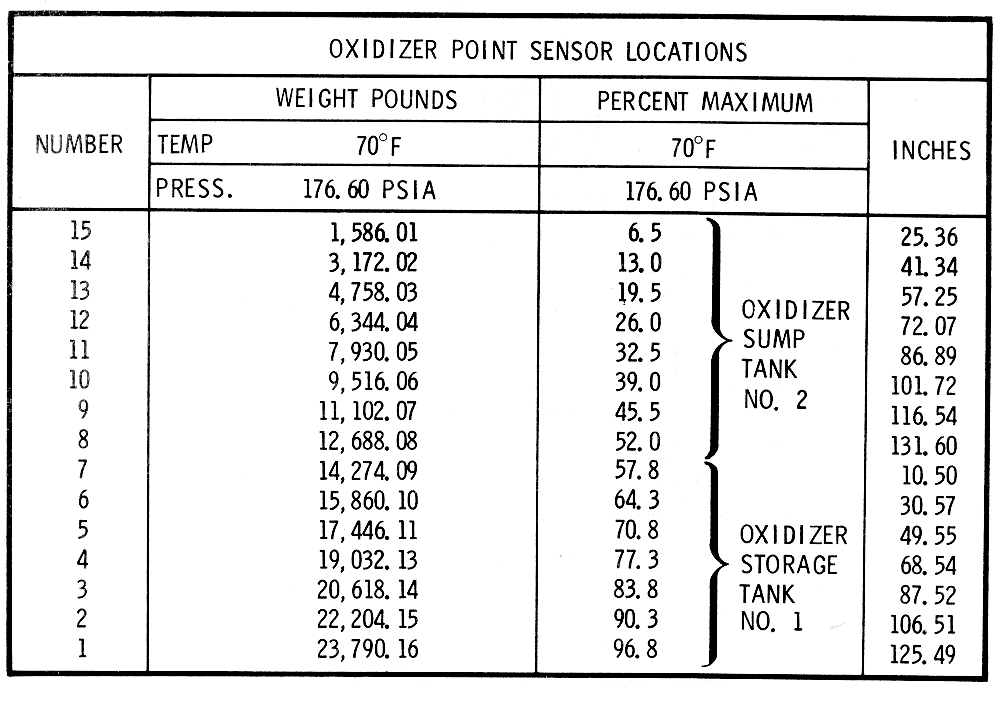
SPS Fuel Point
Sensor Location Diagram

When a T HRUST-ON signal is provided with the PUG MODE
switch in the PRIMARY or NORMAL position, the crew display digital
readouts and unbalance display will not change for 4± 1 seconds to allow
for propellant settling. However, TLM will receive the same signal as upon
completion of the last firing after approximately one second of SPS
THRUST-ON.
When the THRUST- ON signal is provided with the PUG
MODE switch in AUXILIARY position, the crew display digital readouts,
unbalance display, and TLM will receive a change in information
immediately, which is generated from a flow rate integrator that simulates
the nominal flow rate and transmits this as quantity information to the
crew displays and TLM. The crew digital readouts unbalance display and TLM
will not be updated to the propellant from a point sensor for 6.5 ± 1.0
seconds after THRUST-ON. When the THRUST-ON signal is provided plus 6.5
±1.0 seconds, if a point sensor is uncovered, the crew digital readouts,
unbalance display, and T LM will be updated to the propellant remaining at
that point sensor. The time delay of 6.5 ± 1.0 seconds is to the point
sensor system and not to the auxiliary fuel and oxidizer servos, and is to
allow for propellant settling.
Any deviation from the nominal oxidizer to fuel ratio
(1.6 : 1 by mass) is displayed by the UNBALANCE indicator in pounds. The
upper half of the indicator is marked INC and the lower half is marked DEC
to identify the required change in oxidizer flow rate to correct any
unbalance condition. The marked or shaded area is a normal unbalance range
area.
The crew can determine if a true unbalance of
propellant remaining exists. With the PUG mode switch in PRIM or NORM, the
crew display percentage readouts would not indicate the ·same percentage
value and the unbalance meter would indicate the amount of unbalance in
pounds. To verify if a true unbalance condition exists, the PUG mode
switch would be positioned to AUX. If the crew display percentage readouts
and the unbalance meter now read similar to the readouts when in PRIM, a
true unbalance condition exists.
The crew can determine in the case of a malfunction as
to what has malfunctioned within the quantity and indicating systems by
utilization of the TEST switch. To test the PRIM gauging system, the PUG
mode switch must be in PRIM, and to test the AUX gauging system, the PUG
mode switch must be in AUX.
By observing the response of each system in conjunction
with the test switch on MDC-3, the crew can recognize the malfunction or
determine if there is a true unbalance existing.
The crew display readouts and unbalance meter should
not be considered accurate until the SPS engine is thrusting for at least
25 seconds. This is to allow complete propellant settling in the SPS tanks
before the gauging system is within its design accuracy.
When the THRUST-OFF signal is provided, regardless of
the PUG MODE switch position, the visual display fuel and oxidizer
percentage readouts and the unbalance meter display will lock at the
readings displayed. TLM will not receive any propellant quantity
information during THRUST- OFF conditions.
Quantity Computing and Indicating System Test
A test of the sensing systems, excluding the point
sensor and probes, can be implemented during THRUST- ON or OFF periods.
With the PUG MODE switch in PRIM and the TEST switch in TEST 1 (up)
position, the test stimuli is applied to the primary system tank
servoamplifiers (4) after a time delay of 4 +/- 1 seconds. At this time,
the test stimuli will drive the crew display fuel and oxidizer readouts to
an increase reading at different rates. This results in an unbalance and
is so indicated on the unbalance meter crew display as an INC (clockwise
rotation). TLM would receive an increase in propellant quantity from the
prin1ary system tank servoamplifiers TLM potentiorneters. When the TEST
switch is released from TEST 1 (up) position, the TEST switch spring loads
to the center position. This removes the test stimuli, and the crew
displays will lock at the readings that they had been driven to. TLM would
not receive any propellant quantity information.
With the PUG MODE switch in PRIM and positioning the
TEST switch to the TEST 2 (down) position. The test stimuli is applied to
the prirnary system tank servoamplifiers (4) after a time delay of 4+/- 1
seconds. At this time, the test stimuli drives the crew display fuel and
oxidizer readouts to a decrease reading at different rates. This returns
the crew displays close to the reading displayed prior to TEST 1 (up).
Simultaneously TLM would receive the same information. The crew displays
would lock at the new readings if the TEST switch is released to center
(spring loaded). TLM would not receive any propellant quantity information
at this time. If the TEST switch is positioned again to TEST 2 (down),
followed by a time delay of 4+1 seconds, the fuel and oxidizer crew
display readouts would drive to a decrease reading at different rates.
This results in an unbalance condition and is so indicated on the
unbalance meter display as a DEC (counterclockwise rotation). TLM would
receive a decrease in propellant quantity at this time . Releasing the
TEST switch to the center position re111oves the test stimuli and locks
the displays at the new reading. TLM would not receive any propellant
quantity information a t this time. To return to the reading displayed
prior to the second TEST 2 (down) the TEST switch is positioned to TEST 1
(up). After a time delay of 4 +/-1 seconds, the crew displays would drive
to an increase reading at different rates. This returns the crew displays
close to the reading displayed prior to the second TEST 2 (down). At this
time, TLM receives the same information.
To TEST the auxiliary system, the PUG MODE switch i s
positioned to AUX and the TEST switch set to TEST 1 (up) and T EST 2
(down) positions. There are no time delays involved with the auxiliary
system.
With the PUG MODE switch in AUX, and positioning the
TEST switch in the TEST 1 (up) position, the test stimuli is provided to
the auxiliary fuel and oxidizer servoamplifiers (2). This drives the fuel
and oxidizer displays to an increase reading at approximately the same
rates. This results in no or a very small unbalance and is so indicated on
the unbalance meter. At this time TLM would receive an increase in
propellant quantity from the auxiliary system TLM potentiometers.
Releasing the TEST switch to center, removes the test stimuli. The crew
displays lock at whatever readings they had been driven to. TLM would not
receive any information of propellant quantity at this time.
With the PUG MODE switch in AUX and positioning the
TEST switch in the TEST 2 (down) position, the test stimuli is provided to
the auxiliary fuel and oxidizer integrators. This drives the fuel and
oxidizer displays to a decrease reading at the same rates. '.This returns
the crew displays close to the readings displayed prior to TEST 1 (up).
The result is no or very little unbalance and is so indicated on the
unbalance meter crew display. At this time TLM would receive the same
information. Releasing the TEST switch to center, the test stimuli is
removed. This locks the crew displays, and TLM would not receive any
propellant SERVICE quantity information. If the TEST switch is positioned
again to TEST 2 (down), the fuel and oxidizer crew displays would drive to
a decrease reading at the same rates resulting in no or very little
unbalance. TLM would receive a decrease in propellant quantity at the
time. Releasing the TEST switch to center will lock the displays to the
readings that they had been driven to. TLM would not receive any
propellant quantity information at this time. 1'o return to the reading
displayed prior to the second TEST 2 (down), the TEST switch is positioned
to TEST 1 (up). The crew displays would drive to an increase reading at
approximately the same rates. This returns the crew displays close to the
reading displayed prior to the second TEST 2 (down). TLM would receive the
same information at this time. Releasing the TEST switch to center I will
lock the displays at the readings they had been driven to. TLM would
receive no information at this time.
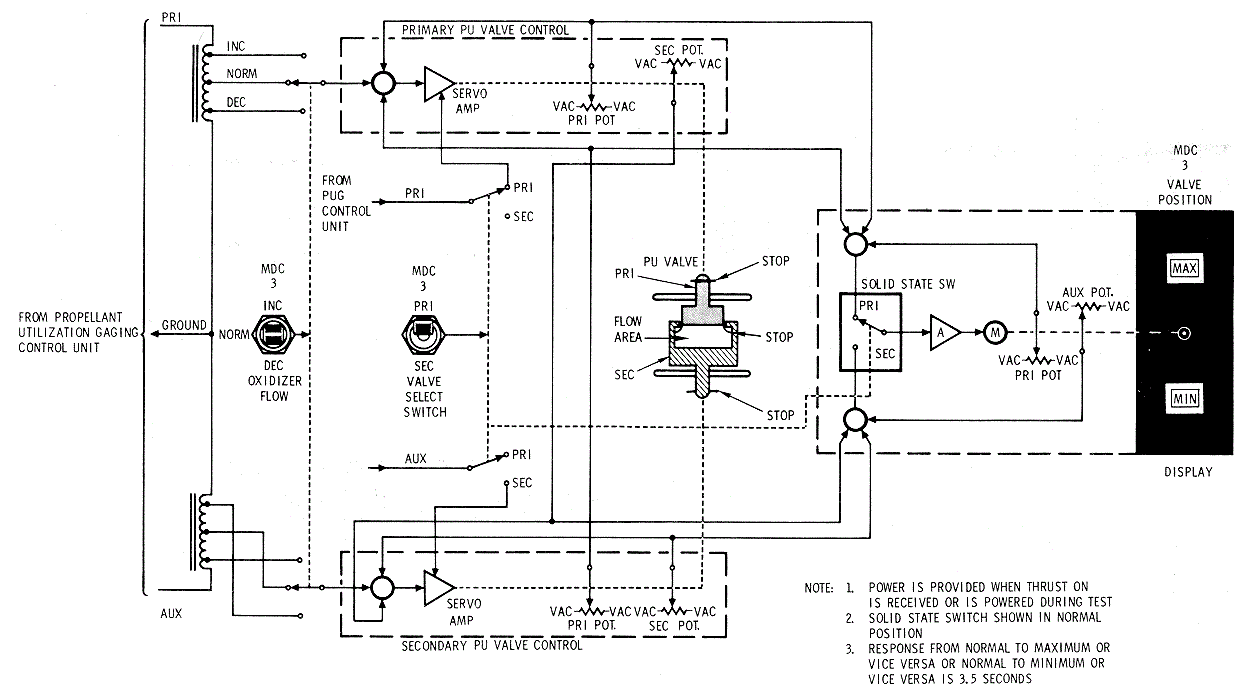
Propellant
Utilization Valve
2.4.2.9.3
If an unbalance condition exists, which is determined
from the INCR, DECR readings on the unbalance meter on MDC-3, the crew may
use the propellant utilization valve to return the remaining propellants
to a balanced condition. The propellant utilization is not powered until a
THRUST-ON command is provided to the propellant utilization gauging
control unit (SPS
Quantity, Sensing, Computing and Indicating System Diagram
and Propellant
Utilization Valve and Flag Display Schematic). The propellant
utilization valve housing contains two sliding gate valves within one
housing. One of the sliding gate valves is the primary, and the remaining
valve is the secondary. Stops are provided within the valve housing for
the full increase or decrease positions. There are separate stops for the
primary and secondary sliding gate valves. The secondary propellant
utilization valve has twice the travel of the primary propellant
utilization valve. This is to compensate for the primary propellant
utilization valve failure in any position.
The propellant utilization valve controls are located
on MDC-3. The OXID FLOW PRIM, SEC switch, selects the primary or secondary
propellant utilization valve for operation. The normal position of the
OXID FLOW VALVE select switch is PRIM. The OXID FLOW VALVE select s witch
will not be moved to SEC unless a problem is encountered with the primary
valve. The OXID FLOW VALVE INCR, NORM, DECR switch is utilized to position
the selected primary or secondary propellant utilization valve. When the
OXID FLOW VALVE switch is in NORM and the OXID FLOW VALVE select switch is
in PRIM, the sliding gate valves are in a nominal flow position. The upper
and lower OXID FLOW VALVE position indicators are gray. When the unbalance
meter informs the crew of INCR, the OXID FLOW VALVE switch is positioned
to INCR and the OXID FLOW VALVE select switch is in PRIM. The primary
sliding gate valve then moves to the increase flow position. The valve
movement will take approximately 3. 5 seconds to reach the full increase
position. The upper OXID FLOW VALVE position indicator would then indicate
MAX and the lower indicator would remain gray. The OXID FLOW VALVE would
then be left in the INCR oxidizer flow position. This will increase the
oxidizer flow approximately 3 percent above the nominal oxidizer flov1.
When the unbalance meter informs the crew of approximately 0 unbalance,
the OXID FLOW VALVE switch is then positioned to NORM. The primary sliding
gate valve would then return to the nominal flow position. The valve
movement will take approximately 3.5 seconds to reach the nominal flow
position. The OXID FLOW VALVE upper indicator would then return to gray.
The lower indicator would remain gray.
When the unbalance meter informs the crew to DECR the
oxidizer flow, the OXID FLOW VALVE switch is then positioned to DECR with
the OXID FLOW VALVE select switch in PRIM. The primary sliding gate valve
then moves to the decrease flow position. The valve movement will take
approximately 3. 5 seconds to reach the decrease flow position. This will
decrease the oxidizer flow approximately 3-1/2 per cent below that of the
nominal oxidizer flow. When the primary gate valve reaches the DECR
position, the upper OXID FLOW VALVE position indicator remains gray and
the lower indicator would indicate MIN. The OXID FLOW VALVE would then be
left in the DECR position. When the unbalance n1eter informs the crew of
approximately O unbalance, the OXID FLOW VA LVE switch is then positioned
to NORM. The primary sliding gate valve would then return to the non1inal
flow position. The valve movement will take approximately 3. 5 seconds to
reach the nominal flow ·position. The OXID FLOW VALVE upper indicator
would then return to gray. The lower indicator would remain gray.
The secondary propellant utilization valve is selected
by positioning the OXID FLOW VALVE select switch from PRIM to SEC. The SEC
position would be selected in the event of a problem with the PRIM. The
secondary sliding gate valve would then be controlled and operated by the
OXID FLOW VALVE INCR, NORM, DECR switch in the same manner as the primary
valve. The position indicators would then operate in the same manner as in
the prin1ary, however, now indicating secondary valve position.
The primary and/or secondary sliding gate valves cannot
be positioned to block or close off the oxidizer flow completely. This is
because the mechanical stops within the sliding gate valves.
The SPS
Functional Flow Diagrams illustrate the THRUST ON- OFF logic
in the command module computer (CMC), the stabilization control subsystem
(SCS) and the manual SPS THRUST DIRECT ON delta V mode.
The SCS circuit breakers on MDC- 8 supply power to
selected switches on MDC-7 and MDC-1. The MDC-7 switches distribute a-c
and d-c power to the SCS hardware and d-c logic power to selected switches
on MDC-1. The G&N (Guidance and Navigation) IMU (Inertial Measurement
Unit} circuit breakers on MDC- 5 supply power to the G/N power switch on
MDC-100. When the G/N power switch is positioned to IMU, power is supplied
to the SC CONT switch on MDC-1. When the S C CONT Switch is positioned to
CMC, a discrete event signal is supplied to the translation control. With
the translation control not clockwise (neutral), this allows the discrete
event enable to the CMC.
The SPS PILOT VALVE circuit breakers MNA and MNB on
MDC- 8 supply power to the respective delta V THRUST NORMAL A and B
switches on MDC- 1. The delta V THRUST NORMAL A and B switches on MDC- 1
supply arming power to the SPS relays and solenoid control valves. These
switches also provide power to the FCSM SPS A and B Switches on MDC-1 (for
CSM 106 through CSM 111, SPS
Functional Flow Diagram). The FCSM SPS A and B switches are
positioned and locked to the RESET /OVERRIDE position (for CSM 106 through
CSM 111, SPS
Functional Flow Diagram). The FCSM SPS A and B switches
provide enabling power to the THRUST ON-OFF logic (for CSM 106 through CSM
111, SPS
Functional Flow Diagram). The FCSM switch nomenclatures are
covered with a blank decal on CSM 106 through CSM 111. The FCSM switches
are removed on CSM 112 and subs (SPS
Functional Flow Diagram).
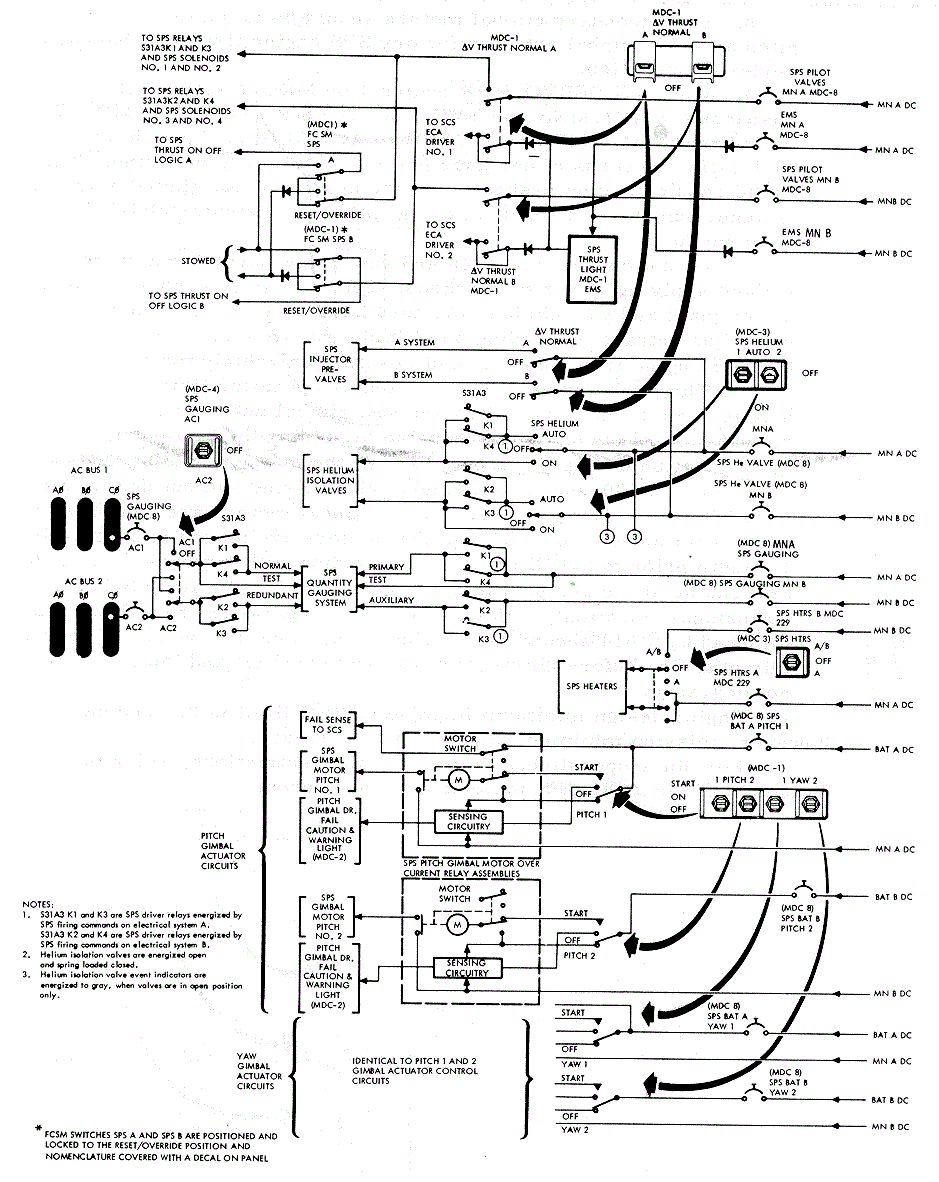
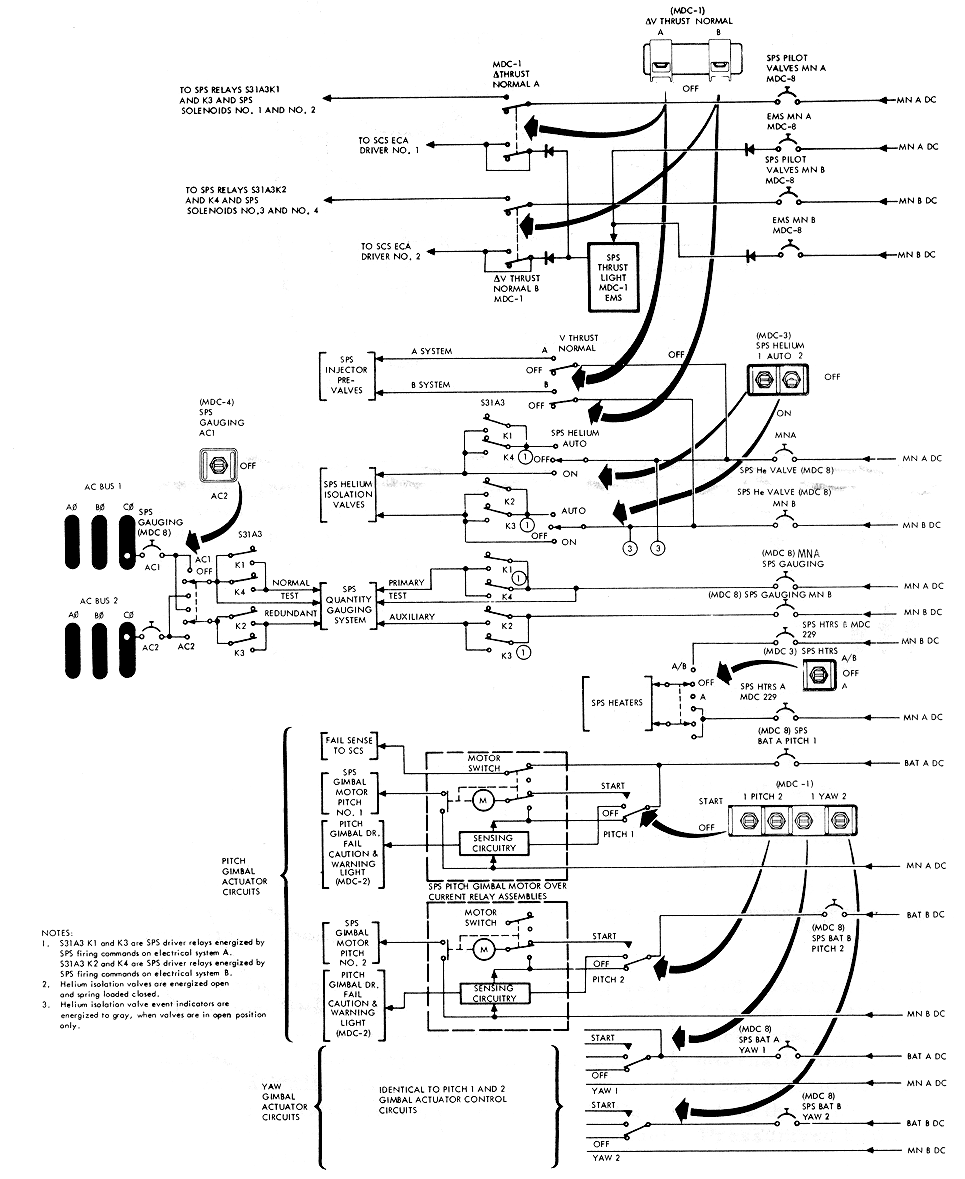
The SPS engine THRUST-ON command is provided by the
THRUST ON-OF F logic in the CMC or SCS delta V modes. The THRUST ON-OFF
logic commands the SPS DRIVERS 1 and/or 2 . The SPS DRIVERS provide a
ground in THRUST ON to the low side of the SPS solenoids and relays. The
SPS DRIVERS provide the removal of the ground in THRUST-OFF conditions to
the SPS solenoids and relays. DRIVER 1 provides a ground for the SPS
solenoids No. 1 and No. 2 and SPS relays S31A3K1 and S31A3K3. DRIVER 2
provides a ground for SPS solenoids No. 3 and No. 4 and SPS relays S31A3K2
and S31A3K4. The SPS relays when energized provide power to the SPS
quantity gauging system and SPS He VLV 1 and 2. The SPS He VLV switches on
MDC-3 must be in A UTO and the SPS gauging switch on MDC-4 in AC 1 or AC2.
The solenoid control valves when energized allow GN2 pressure to be
supplied to the respective bipropellant valve (ball valve} actuators. The
respective ball valves when opened, allow propellants to flow into the
injector and atomize and ignite (hypergolic).
The SPS THRUST DIRECT ON switch on MDC-1 provides an
alternate backup mode to the CMG and/or SGS delta V modes. When the SPS
THRUST DIRECT ON switch is positioned to SPS THRUST DIRECT ON, a ground is
provided to the low side of the SPS relays and solenoid control valves.
The engine is commanded ON (providing the delta V THRUST NORMAL switches
are in A and/or B) regardless of the SPS THRUST ON-OFF logic.
The SPS DRIVERS No. 1 and/or No. 2 will remove the
ground on the low side of the SPS relays and solenoid control valves, when
commanded by the THRUST-OFF logic in the CMG or SGS delta V modes. The
THRUST-OFF command allows the SPS relays and solenoid control valves to
de-energize. This allows the solenoid control valves to dump overboard the
GN2 pressure within the actuator. The actuator spring pressure drives the
ball valves closed, thus shutting the engine down.
In the SPS THRUST DIRECT ON mode, the ground on the low
side of the SPS relays and solenoid control valves is removed by
positioning the SPS THRUST DIRECT ON switch to NORMAL. This allows the
solenoid control valves and relays to de-energize and shut the engine down
in the same manner as the SPS DRIVERS.
The delta V THRUST NORMAL A switch positioned to A
enables the (A bank) logic circuitry, arms the (A bank) SPS relays and
solenoid control valves and energizes injector prevalve A. The injector
prevalve then allows GN2 pressure to solenoid control valves No. 1 and No.
2. The delta V THRUST NORMAL B switch positioned to B enables the (B bank)
logic circuitry, arms the (B bank) SPS relays and solenoid control valves
and energizes injector prevalve B. The injector prevalve then allows GN2
pressure to solenoid control valves No. 3 and No. 4.
The CMG commands THRUST-ON in the CMG delta V mode by
supplying a logic 0 to the THRUST ON-OFF logic. This is providing that the
SC CONT switch is in the CMG position and translation control not
clockwise (neutral). The SPS DRIVERS then provide the ground to the SPS
relays and solenoid control valves. The delta V THRUST NORMAL A switch is
positioned to A for single-bank operation. If double-bank operation is
desired, 5 seconds or later after SPS THRUST-ON, the delta V THRUST NORMAL
switch B is positioned to B. When the CMG changes the logic signal from a
0 to a 1, THRUST-OFF is commanded. The delta V THRUST NORMAL switch A
and/or B are then positioned to OFF.
The SCS delta V mode is obtained by positioning the SC
CONT switch to SCS. A thrust enable signal is obtained from the EMS/ delta
V display counter if at or above 00000.0. THRUST ON is commanded by a +X
translation and by depressing the THRUST-ON pushbutton (MDC-1). The +X
command signal is necessary to enable the THRUST-ON logic. The +X command
function may be obtained by depressing the DIRECT ULLAGE pushbutton on
MDC-1, or positioning the translation control to +X, or positioning the
translation control counterclockwise (SPS abort mode). The difference
between the commands is that the DIRECT ULLAGE or SPS ABORT commands
initiate an SMRCS engine direct coil firing and inhibits the SMRCS engine
auto (coil) pitch and yaw solenoid drivers, IGNITION 1 (IGN- 1). The
translation control positioned to +X utilizes the SM RCS engine auto
coils; thus, attitude hold may be obtained. The SM RCS engine auto coils
(pitch and yaw) are then inhibited automatically 1 second after SPS engine
THRUST ON by the IGN-1 command. When the ground to the SPS solenoids and
relays are provided by the SPS DRIVER or DRIVERS, the THRUST ON pushbutton
may be released and the +X command terminated. The SPS engine firing is
maintained by the SCS lock-in circuit. The delta V THRUST NORMAL A switch
is positioned to A for single-bank operation. If double-bank operation is
desired, 5 seconds or later after SPS THRUST ON, the delta V THRUST NORMAL
B switch is positioned to B. The +X command function and the THRUST ON
pushbutton depressed must be initiated again to supply THRUST-ON to the B
bank and B SCS logic. When the EMS/ delta V counter reads .
1, the EMS 1 delta V counter enable signal is removed and THRUST-OFF is
commanded. The delta V THRUST NORMAL A and/or B switch are then positioned
to OFF.
The SPS THRUST ON-OFF logic may be switched from the
CMC to the SCS delta V mode during an SPS engine thrusting period. The
translation control may be rotated to the clockwise position or the SC
CONT switch to SCS. In either case the THRUST ON-OFF logic is transferred
to the SCS delta V mode. The SPS engine would continue thrusting
(providing the EMS/ delta V counter is at or above 00000.0) by the
presence of the SCS lock-in circuit. THRUST OFF will be commanded as in
the normal SCS delta V mode.
If the manual SPS THRUST DIRECT ON mode is desired, the
delta V THRUST NORMAL A switch is positioned to A (for single-bank
operation) and the SPS THRUST DIRECT switch is positioned to SPS THRUST
DIRECT ON. The SPS THRUST DIRECT ON switch positioned to SPS THRUST DIRECT
ON provides a ground to the SPS relays and solenoid control valves. If
double-bank of operation is desired, 5 seconds (or later) after SPS thrust
ON, the delta V THRUST NORMAL B switch is positioned to B. To terminate
thrust in the SPS THRUST DIRECT ON mode, the SPS THRUST DIRECT ON switch
is positioned to NORMAL. Under certain conditions the SPS THRUST DIRECTION
switch positioned to NORMAL will not shut the engine down. The conditions
are: with the SGS LOGIC BUS PWR switch on MDC- 7 positioned to 2/3, and
with the SC CONT switch in MDC-1 in SGS or SC CONT switch in CMC and
translation control clockwise and delta V counter above 0. In the
aforementioned condition the SCS 6. V mode has inadvertently paralleled
the SPS THRUST DIRECT ON mode. With the SPS TRUST DIRECT ON switch in
NORMAL, the EMS/ delta V counter reaching -.1
would provide THRUST OFF as in the normal SCS delta V mode. If the SPS
THRUST DIRECT ON switch was positioned to NORMAL when the EMS/delta V
counter was below -.1, the SPS THRUST DIRECT ON switch to NORMAL would
shut the engine down.
A manual back-up THRUST OFF command for the CMC, SCS,
or SPS THRUST DIRECT ON mode is obtained by the delta V THRUST NORMAL A
and B switches. If single-bank operation was used, positioning the
applicable delta V THRUST NORMAL switch to OFF would shut the engine down.
If double-bank operation was used, positioning delta V THRUST NORM AL
switches A and B to OFF would shut the engine down. Positioning the delta
V THRUST NORMAL switches A and B to OFF removes the arming power from the
SPS relays and solenoid control valves.
The SPS THRUST- ON-OFF logic circuitry also provides
several output functions. A ground is provided for the illumination of the
THRUST-ON lamp on the EMS display. The ground is sensed by SPS ignition
logic. It is noted on , SPS
Functional Flow Diagram
that as long as the EMS MN A and/or MN B circuit breakers on
MDC-8 a r e closed, with the delta V THRUST NORMAL switches A and B on M
DC- 1 in the OFF position and the FCSM SPS A and B switches on MDC-1
positioned and locked in the RESET /OVERRIDE position on CSM 106 through
CSM 111 (SPS
Functional Flow Diagram), the SPS THIZUST ON light 0n the EMS
MDC-1 will not be illuminated. The FCSM SPS A and B switches are removed
on CSM 112 and subs (SPS
Functional Flow Diagram). The SPS THRUST ON light on the EMS
will illuminate when a ground is provided through the logic circuit d rive
r No. 1 and/or No. 2, or when the SPS THRUST DIRECT ON Switch on MDC-1 1s
positioned to SPS THRUST DIRECT ON.
The SM RCS auto pitch ·and yaw RCS disabling signal
IGN- 1 is not present until one second after SPS ignition in the SCS delta
V mode, and is not removed until one second after SPS THRUST-O FF in the
SCS delta V mode, IGN-2 logic signal is required for the SCS-TVC and MTVC
logic . The IGN-2 logic signal is generated at the same time the SPS
solenoids are grounded when in the SCS delta V mode, but is not removed
until one second after ground is removed to maintain SC control during SPS
thrust-off decay.
The SPS ROUGH ECO caution and warning light on MDC- 2
for CSM 106 through CSM 111 is covered with a blank decal. The flight
combustion stability 1nonitor system is rendered inoperative on CSM 106
through CSM 111 by stowing the power input wires to the FCSM,
SPS Functional Flow Diagram.
The FCSM SPS A and SPS B switch nomenclatures are covered by a blank decal
on CSM 106 through CSM 111. The FCSM SPS A and SPS B switches are
positioned and guarded to the RESET /OVERRIDE position on CSM 106 through
CSM 111 (SPS
Functional Flow Diagram). The SPS RO UGI-I ECO caution and
warning light, the FCSM SPS A and SPS B switches, the SPS READY signal to
the CMC and the FCSM components are physically removed on CSM 112 and subs
(SPS
Functional Flow Diagram).
The following list contains specific data on the
components in the SPS:
Helium Tanks
(2)
3600±50- psia nominal fill pressure, 4400-maximum I
operating pressure. Capacity 19. 4 cubic ft each, inside diameter 40 in.,
and a wall thickness of 0.46 in. Weight 393 lbs. each.
Regulator Units
(2)
Working regulator, primary 186±4 psig, secondary 191±4
psig. Primary lockup 195 psig. Secondary lockup 200 psig. Inlet filter 10
microns nominal, 25 microns absolute. Normally locked- up (closed)
regulators, primary 181±4 psig, secondary 191±4 psig. Prin1ary lockup 195
psig. Secondary lockup 205 psig.
Inlet port 40-micron nominal, 74-micron absolute. Test
ports 50- micron nominal and 74-micron absolute. One at inlet to check
valve assembly; one at each test port.
Fuel and oxidizer underpressure setting (SPS PRESS
light, MDC-2), 157 psia. Fuel and oxidizer overpressure setting (SPS PRESS
light MDC-2), 200 psia.
Propellant
Utilization Valve Control
(2)
Increase position, approximately 3% more than nominal
flow.
Norm al position, nominal flow. Decrease position,
approximately 3.53% less than the nominal flow.
Response time, normal to increase or vice versa, or
normal to decrease or vice versa, is 3.5 seconds.
Quantity Sensing
System Accuracy
Indicators - Difference between actual quantity and
total indicated quantity for each propellant shall not exceed ±0. 35% of
full tank plus +O. 35% of propellant remaining separately to total fuel
and oxidizer separately.
T LM - Difference between actual quantity in each tank
and that represented to TLM be within ±0.35 % of full tank plus +0.35 % of
propellant remaining.
Diaphragm rupture, 219±6 psig. Filter, 10 microns
nominal, 25 microns absolute. Relief valve relieves at 212 minimum to 225
psig maximum, reseats at 208 psig minimum. FLOW capacity 3 lbs/minute
maximum at 60° F and 225 psig. Bleed device closes when increasing
pressure reaches no greater than 150 psig in cavity, and reopens when
decreasing pressure has reached no less than 20 psig.
Total tank capacity 11284. 69 lbs.
Fill pressure 110 psia.
Height 154. 47 in.
Inside diameter 45 in., wall thickness 0.054 in.
128. 52 cubic feet
Total tank capacity 13923. 72 lbs. = 57. O %
Fill pressure 110 psia.
Height 153.8 in., diameter 51 in., wall thickness 0.
054 in.
161. 48 cubic feet
Total tank capacity 7058. 36 lbs.
Fill pressure 110 psia.
Height 154. 47 in., diameter 45 in.
Wall thickness
0. 054 in.
128. 52 cubic feet
Total tank capacity 8708. 10 lbs. - 57. 0%.
Fill pressure 110 psia.
Height 153. 8 in., diameter 51 in.
Wall thickness 0. 054 in.
161. 48 cubic feet
Total oxidizer 25208. 41 lbs = 103. 4%.
Total fuel 15766. 46 lbs = 103. 4%.
99. 9% oxidizei gaugeable 24389. 10 lbs.
99. 9% fuel gaugeable 15252. 70 lbs.
Pressurized to 10±5 psig of helium when empty to
prevent collapsing of tanks (negative pressure of 0.5 psig will collapse
tanks).
500 microns absolute.
GN2
Bipropellant Valve Control Systems (2)
GN2 storage vessel pressure 2500±50 psi at 68 °F, 2900
psi at 130°F. Support 43 valve actuations. 120 - cubic inch capacity,
each. Inside diameter 4. 65 in., length 9, 6 in.
Regulator - single stage, dynamic 187 psig minimum.
Lockup pressure 195 to 225 psig. Relief valve relieves at 350± 15 psi,
reseats, at not less than 250 psi.
GN2 filters, one between each GN2 supply tank and
injector prevalve, 5 microns nominal and 18 microns absolute. One at each
GN2 regulator outlet test port, 5 microns nominal and 18 microns absolute.
750-second service life. Support 36 restarts minimum.
Expansion ratio = 6 to 1 at ablative chamber exit area
= 62. 5 to l at nozzle extension exit area.
Chamber cooling, ablation and film cooled. Nozzle
extension, radiation cooled.
Injector type, baffled, unlike impingement.
Oxidizer lead 8 degrees
Length 159. 944 in. maximum Nozzle extension exit
diameter 98. 4 in. inside diameter
Weight approximately 650 lbs.
Injector flange temperature, illuminates SPS FLANGE
TEMP HI caution and warning light on MDC-2 at 480°F. (Light disconnected
and covered with decal on CSM 108 and subs.)
SPS Pc transducer, Pc displayed on MDC-1 through SPS Pc
theta switch to SPS Pc theta, indicator on MDC- 1.
Green range on indicator is 65 to 125% (psia). Normal
95 to 105 % (psia).
6 heaters, 2 elements on each heater, 3 elements in
series on the fuel side rated at 15 watts, 9. 4 watts, and 18.8 watts; 3
elements in series on the oxidizer side rated at 15 watts, 9. 4 watts, and
18. 8 watts. SPS heater Switch position A/B on MDC-3 supplies 28 vdc to 12
elements. SPS heater switch position A on MDC-3 supplies 28 vdc to 6
elements.
Structural mounting pad offset 4 degrees to +Y. About
Z-Z axis ±4.5 (+0. 5, -0. 0) degrees with additional 1 degree for snubbing
(yaw), null 1 degree to + Y (thrust vector) during SPS thrusting periods,
0 degree during non SPS thrusting periods. About Y-Y axis ±4 .5 (+0.5,
- 0.0) degrees with additional 1 degree for snubbing (pitch), null 2
degrees to +Z (thrust vector) during SPS thrusting periods, + 1.5 to +Z
during non SPS thrusting periods.
Overcurrent dependent upon temperature during start
transient and steady state. Quiescent current of 60 milliamps ± 10
percent. Pressurized to 3 to 5 psi of dry air. Deflect ion rate 0.12
radians per second (low side, 6.87° per second) to 0. 132 radians per
second (high side, 7.56° per
second).
Refer to CSM/LM Spacecraft Operational Data Book
SPS Electrical Power Distribution
Electrical Power
Distribution Schematic
(CSM 106 Through CSM
111)
(CSM
112 and Subs)
OPERATIONAL LIMITATIONS AND RESTRICTIONS
a.
Propellant quantity gauging
subsysten1 is operational only during engine thrusting periods. A
4±1-second SPS thrusting period is required before the primary capacitance
system provides updated information to telemetry and crew displays with
the PUG MODE switch in PRIM or NORM. In addition, with the PUG mode switch
in PRIM, NORM, or AUX position, the crew display readouts and unbalance
meter should not be considered accurate until the SPS engine is tl1rusting
for at least 25 seconds. The delays plus the previous statement are to
allow the propellant to settle and stabilize within the SPS tanks before
the gauging system is within its accuracy.
b.
Pitch and yaw gimbal actuator
limitations:
1. Allow one - half second
between actuation of the GMBL MOTOR switches on MDC - 1 to minimize power
transients.
2. The secondary gimbal
motors should be in operation in the pitch and yaw gimbal actuator for any
SPS engine firing for back-up modes of operation.
3. The TVC SERVO PWR switch
1 on MDC-7 should not be positioned to AC1/MNA and TVC SERVO PWR switch 2
on MDC-7 positioned to AC2/MNB or switch 1 to AC2/MNB and switch 2 to
AC1/MNA in excess of one hour prior to an SPS engine firing. This would
result in some preheating of the pitch and yaw gimbal actuator clutches
which could result in a degradation of actuator clutch performance.
4. Do not operate the pitch
and yaw ·gimbal actuator motors without applying power to the thrust
vector control servo amplifiers as the pitch and yaw gimbal actuators have
a natural tendency to extend or retrace (depending on altitude and
pressure) and may drive the SPS engine from snub to snub resulting in
vehicle motion.
5. The pitch and yaw gimbal
actuator operating time should be held to a minimum. The pitch and yaw
gimbal actuator clutches with gimbal motors operating are capable of
holding the SPS engine at a given position during the boost phase of the
mission (820 seconds) followed by a 100 - second SPS engine abort firing
without degradation. If no SPS abort firing is required the gimbal motors
are shutdown at earth orbit acquisition. The gimbal motors are placed into
operation 1 minute prior to S- IVB translunar injection with clutches
holding the SPS engine at a given position, followed by a 5 -1/2-minute S
- IVB firing (t rans lunar injection), followed with CSM separation from
the S-IVB, followed by a 6 14-second SPS engine firing, and followed by 1
minute idle post fire before gimbal motors are turned off and the clutches
not degraded.
c.
Engine design minimum impulse
control limit is 0.4 second; however, mission minimum impulse may be
longer.
d.
For other operational limitations
and restrictions, refer to Volume 2 of the AOH SPS malfunction procedures.